Have you ever thought off or wish to schedule the content updates in your WordPress website. If yes, you are at the exact place in this post we will show you how to automatically schedule content updates in WordPress.
WordPress gives you a wonderful feature to schedule a post or page whenever you want but beginners won’t be knowing about it. When new content is publishing regularly you will get more pages indexed on search engines, a lot of visitors may engage to your website and makes your site readers coming back again and again.
By default in WordPress, as soon as the content is written, you have to click the button “Publish” to make it live.
Reasons to schedule content updates in WordPress
There are many reasons that you may don’t want your content to go live immediately.
The basic reason is you may want to give fresh content to your readers on a daily basis but at a certain time, you won’t have time to post it.
Maybe you are planning to take a break for 2 to 3 days but you cannot leave your blog just like that without any updates. Moving on a trip, at that time you won’t be able to publish the content. If you are in a mood of writing the articles but you don’t want to publish everything at a time.
If there is a sale upcoming, and you want to write about and post it exactly on the day before. But there are chances you may forget to publish due to your other works. So by scheduling content updates to your website saves you from all the reasons, and your blog will be in up to date. There are methods that you can automatically schedule content update.
Scheduling content updates in the text editor
Step 1: Navigate to Dashboard > Posts/Pages > Add New and start writing your content

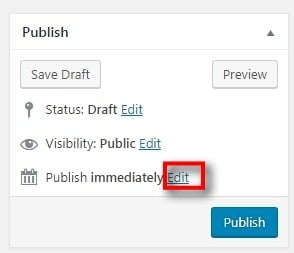
Step 2: Once written, in the right-hand side you will find the publish section, under the publish section, you have an “Edit” link near the publish immediately field
Step 3: By clicking the link, you will be able to edit the date and time when the content has to be published. Edit the month, date, year and time. And then click the “Ok” button to save the changes.
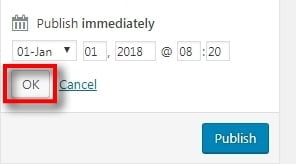
Step 4: Once the date and time are scheduled, now the field will be changed as “Publish on” with the particular date mentioned. In case if you want to re-edit it, then click the “Edit” link

That’s it, your content will be published on the particular date and time you entered.
Scheduling content updates using a plugin
There are dozens of plugins available in the WordPress repository to schedule content updates. One among them is “publish to schedule” plugin.
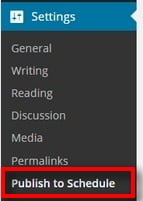
Step 1: Install and activate the plugin and you can configure the plugin. Navigate to Settings>Publish to Schedule
Step 2: In that page, you can set how many posts to be published for each day and then you can enter the time interval of when to publish the content
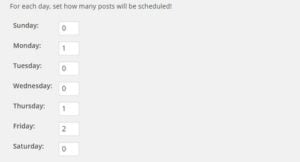
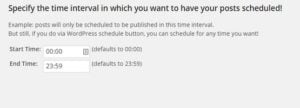
Once you have set the number of posts for each day, and the time interval for the post, now use the plugin to publish the content
Step 3: Now moving on to a new post, the “Publish” button will be replaced by “Public to Schedule” button
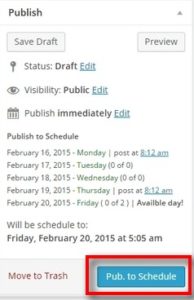
Step 4: Then you can even overwrite the scheduled post by clicking the “Edit” link next to publish immediately field.
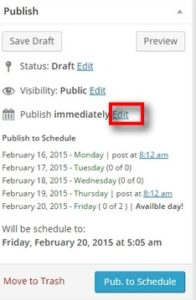
That’s it your post have been scheduled as per your time and date, and wait for them to auto-publish.
Scheduling content updates using Quick Edit link
This is one of the easiest methods where you can schedule a date even for the published content. In case you have published a post, and you made the post entirely new with the same title, and wish to publish the post again as fresh content. You can schedule the date and time and publish it again
Step 1: Navigate to Posts > All Posts and hover the mouse on the title you want to schedule. You will find a “Quick Edit” link
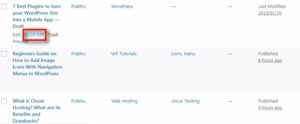
Step 2: Clicking the link, you will be able to schedule the date and time, enter the date that you want to publish. Once everything is set, click the “Update” button to save your changes

Conclusion
The above mentioned are the possible methods to automatically schedule content updates on your WordPress website. Hope you got an idea on how to schedule content updates in WordPress. If you have any queries or suggestion please feel free to comment to us. You can subscribe to us at Facebook and Twitter.
You may also like to share this post
