During the pandemic situation, online sales have increased dramatically and the usage of the internet has also been increasing in developing countries. So, it is highly needed to move the offline business to an online one. Since most people are willing to purchase through online mode. So, the opportunities in online shopping have been increasing worldwide.
Also, the internet allows you to sell your products worldwide. The reality is that converting to online sales is not the solution to increase sales. You should create the best platform to showcase your products to your customers. In this case, WooCommerce will be the best option out of all other platforms available in the market.
Why WooCommerce?
WooCommerce is an open-source platform developed by WordPress-powered websites. It has many themes, offers stable and secured platforms, and is fully responsive.
Most eCommerce platforms will charge for licensing but WooCommerce won’t charge for licensing but it costs only for hosting your WooCommerce platform. The main advantage is that WooCommerce has a lot of designs, templates available for free.
WooCommerce also holds many plugins with many e-store functionalities and plugins for firewall, backup, tax collection, payment services, etc.
Requirements before using WooCommerce
There are some requirements that should be met before starting WooCommerce. Since those requirements will be your pre-requisite.
- WordPress account.
- WooCommerce plugin should be enabled in WordPress.
- Registered domain name for WooCommerce.
- SSL certificate for enabling security.
The next section will be the demonstration on real-time installation and working of WooCommerce. The below section helps you in understanding the WooCommerce plugin from scratch.
Installation
Installation is the first step to converting your store into an e-store. To do so, just move into your WordPress login and follow the below procedure to install the WooCommerce plugin successfully.

Just find the option “Plugin” on the left side of your screen and click the “Add New” button from the new screen. It takes you to the plugin screen where it is mentioned as WooCommerce in the search area. Then install and activate the plugin.
WooCommerce Setup
Setting up WooCommerce is the base for your online store. Since it has all basic functionality options. The setup screen has the following options. They are,
- Basic functionality
- Industry
- Product type
- Business details
- Theme
Basic Functionality

The basic functionality or initial screen in setup requires the user to provide the physical location of your store.
Industry

Mention the correct industry type to enter into the next step.
Product Types

Select the product types preferred for selling through your online store.
Business Details

This option helps in enabling the marketing tools to boost your business.
Theme

You can choose any theme required.
Demonstration
This demonstration section will give a detailed view of the options available in the Woocommerce plugin. It starts from the product section to all.
Products
As your product store, the products should be showcased in the online store too. WooCommerce gives many options to add and maintain the products on WooCommerce. First, you should know the process to add the products to your online store.
Add new products

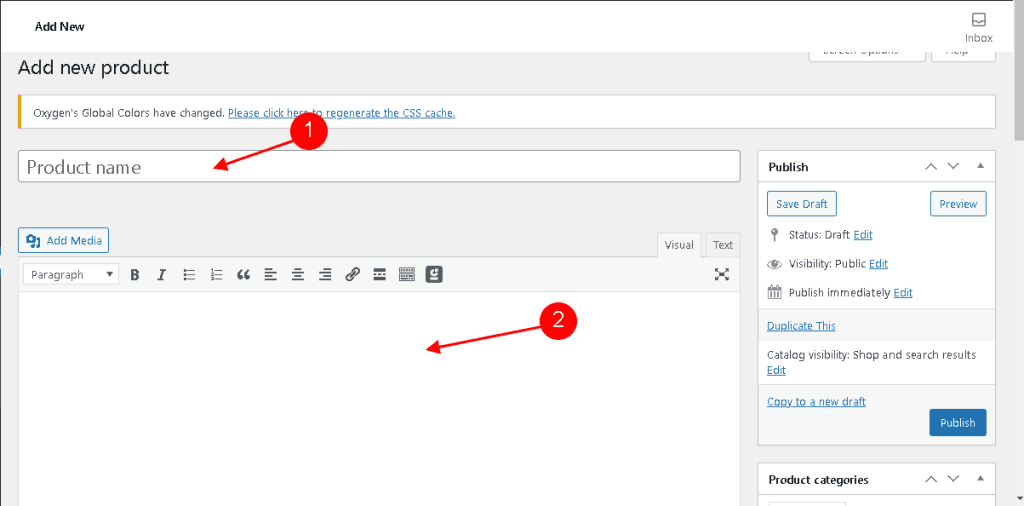
To add a new product to your store, click on the “Add New” button under the product option on the right side of your screen. Each product should have a title and description of the product.

To find the product based on the categories then bring the product under any categories already created or create a new category.

A product without the image will not be trusted. So, WooCommerce has an option to add an image of the product.
Product type
The product data field describes the product type and gives the way to link similar products to the main product. There are four different types of product data available.
- Simple product
- Grouped Product
- External/Affiliated product
- Variable product

The below section and options will be the same for all the product types but some options may be enabled or disabled as per the type.
General Tab:

The General tab gives the option to give the regular price also there is a field to give the sale price during the festival period. The date field helps in enabling the sale price for particular sales periods.
Inventory Tab:

Inventory tab directly related to the stock keeping unit. This tab enables the admin to mention the stock availability for the specific product. This could help the storekeeper to give orders to increase the stock.
Shipping Tab:

The shipping tab helps during shipping the product to the customers. It will be notified to the shopkeeper while shipping the orders to the customer.
Linked Products tab:

The upsell field suggests the product to the customer when the current product is out of stock. The cross-sell will promote the new product along with the current product.
Advanced Tab:

The advanced tab gives the way to provide a purchase note for the customer. Also, the menu order enables the product to be displayed in the menu order.
Attributes Tab:

The attributes for the products can be added using the attributes tab.
Orders
Now the products are ready for the orders to be in the customer’s hand. WooCommerce has its own order management system by default. To manage the order just find the options available on the right screen.

The initial screen shows the product name, date of order, status of the product. The amount quoted for the products.
New orders

The order management platform gives the opportunity to add new orders manually. To get this page click on the “Add New” button in the initial screen of the order management.
In this new order screen, you can add the product, billing address, and shipping address. Even you can add coupons to the orders.
Reports:

The report section helps to show the growth of the sale in your online store. The report can be generated for a week or month or specific date.
General Settings
This screen has the fields which are found during the initial setup. Here, you can again give the address details in addition to that enabling/disabling taxes and coupons. The currency can also be added in these settings which will be displayed to the frontend users.

Product Settings
The product settings give the opportunities to mention the measurement unit and enable the reviews and ratings for products. The product settings will be changed only for the products like inventory and downloadable products.

Shipping Settings
The settings for the shipping give some options for setting the shipping zone and you can add the zone too. You can apply the taxes and charges for the shipping, even the shipping classes too.

Payment Settings
The payment settings enable the storekeeper to mention their comfortable payment methods like COD, check payments, etc.

Settings – Accounts & Privacy
This setup helps in providing privacy policies and retention on personal data. You can mention the permission for guest checkout, remove personal data, account creation permission, etc.

Email Settings
The main process of email setting is to mention the format while sending the email to the customers. Through these settings, you can set header, footer text, color, etc. Everything will be reflected in the email sent to the customer.

Up to now, we have seen some basic functionality and options available in the WooCommerce plugin. In addition, there are many templates and themes available for supporting WooCommerce functionality. There are some themes in the plugins like Astra, Shoppe, etc.
Conclusion
WooCommerce will satisfy the need to convert your physical store to an online store. Since its friendly options would give more comfort and support from experts to solve your problems and needs. This article is just an outline of the entire WooCommerce functionality but it has more options yet. Those can be achieved if you use WooCommerce regularly.
Hope you like our post, WooCommerce beginners guide. You can follow us on Facebook and Twitter to get the latest updates.
Prabhu Ganesan provides his web development and WordPress services independently. He is the founder of WPBlogX. He is very much involved in WordPress as it becomes second nature for him. You can get in touch with him by visiting his website – WPBlogX.com and you can also find him on Twitter @gprabhucbe.


