When you planning to create a new theme for your website, then custom menu plays an important role. Custom menus are also used to add additional menus to your current working theme. Just by entering a few lines of code, you will able to create a custom menu for your website. The following procedure shows how to create custom menus in WordPress.
Note: Create the pages which are to be displayed on the menus of your website, before starting the process of creating custom menus and displaying it. For example(About us, Contact us, Home, Careers etc).
Register the custom navigation menu
Initially, to display the menu option in your WordPress dashboard, you have to register the navigation menu using register_nav_menu() function. You have to register this in the functions.php file which is in your themes folder. The syntax for registering the menu is
register_nav_menu($location, $description); – Create single Menu
register_nav_menus(array($location1=>$description, $location2=>$description); – Create multiple menus
You can enter the following lines of code, on the functions.php file:
<?php

Function register_my_menu() {

register_nav_menu(‘primary’, ‘Primary Header Menu’);

}

add_action(‘init’, ‘register_my_menu’);

?>
Init is the action hook here, it is used to run your function when initialized. If you wish to add multiple menus, then add the following lines of code, instead of the previous code:
<?php

function register_my_menus () {
   register_nav_menus(array(
       'primary' => _( 'Primary Header Menu' ),
       'secondary' =>_('Secondary Menu')
   ));
}
add_action( 'init', 'register_my_menus' );
?>
If you add this code in a functions.php file, then the menus will be added under Appearance > Menus > Theme Locations.
Display navigation menu
Based on your preference you can display the navigation menu wherever you want. To display the navigation menu, we use wp_nav_menu() function in WordPress. The syntax for displaying the navigation menu is
wp_nav_menu(array $args=array());
For example, if we want to display the menu in the header, then we have to override the header.php file by adding the following code:
<?php wp_nav_menu(array(‘theme_location’=> ‘primary’)); ?>
In case if you wish to add the menus to the footer as well, then enter the following lines of code, in footer.php as well:
<?php wp_nav_menu(array(‘theme_location’=> ‘secondary’)); ?>
Note: You can give the above snippet anywhere as you wish, wherever you give it works. So nothing to get much stressed about displaying the menus.
After adding those above codes you can see your site like this

Creating a new menu using WordPress admin dashboard
1. In your WordPress admin dashboard, you will find Appearance > Menus option. Then click on the “Edit Menus” option, you will find a link as create a new menu, click on to that link, and create a name for your menu. And then click the Save menu button.

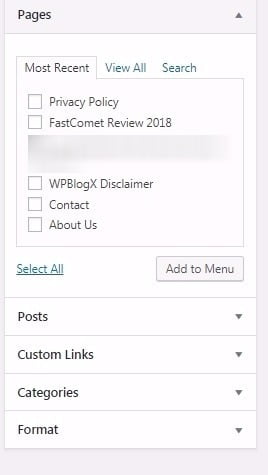
2. Now your menu is ready, you can add items to your menu which is on the left-hand side. There you can select the posts, pages, or categories and then click on the add to menu tab.

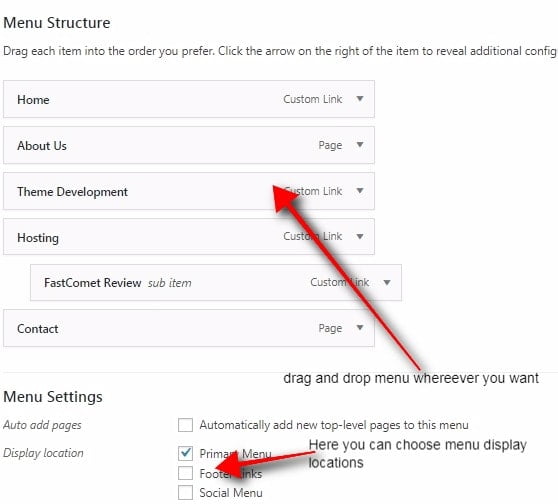
3. You can even click on the Screen Options at the top right of the WordPress dashboard to activate further menu items options. Now you will able to see your menu items as a list in the newly created menu. In order to add new custom link menu lists in your menu, you have to add custom link URL and your own custom text.

4. You can change the order of your menu list and even create a submenu, by just drag and drag. Just drag the left or right items in order to create submenus within your custom menus.

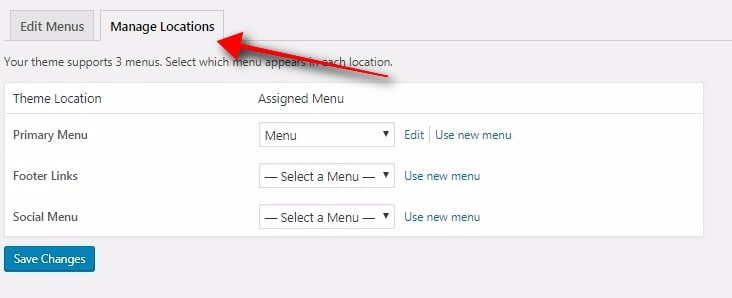
5. Once your menu is ready, you have to choose a place for the custom menu to appear. Move on to the Manage Location tab at the top of the Menus screen. Once the location is selected, click on the save changes button.

These are the basic procedure to create a custom menu. You can add any effects, styles, images in your custom menu. This article just states you on how to create a custom menu in WordPress. Hope you got a basic idea of creating a custom menu in WordPress. If you have any queries or comments, please feel free to comment to us. You can subscribe to us at Facebook and Twitter.
