XAMPP is developed by Apache friends which is available for free and it is an open-source cross-platform web server. The main purpose of XAMPP is to convert your system into a server for testing a website before moving into a live server. In this post, we will look into How to Fix the XAMPP Localhost index.php Error.
XAMPP can also be applied on a server, when the server gets started, it converts your localhost to be a server. So, it will be easy for you to test your website or an application easily as it is working on the server. It provides a platform to test and verify your project based on MySQL database, PHP, Perl, and Apache through your system itself.
You can also test and verify your WordPress website using this XAMPP. In some cases, you may receive an error message from the XAMPP server when it tries to access your site’s index.php file. It is a common error.
This error could be easily solved in multiple ways, but choosing the right solution to solve the error is a challenge. Don’t worry, this article guide provides two solutions to solve this error. Just read this article up to the end.
What does the index.php error mean?
The index.php error is raised when you’re attempting to access localhost/xampp/index.php. The index.php is the entry point to enter into your website but think if it is inaccessible then you can’t access your website. The error will be notified in two different ways. In some situations, it shows an “Object not found” error, and in some situations, it shows the XAMPP dashboard. It automatically redirects to “localhost/dashboard”.
This error will frustrate you because the error will not have any message. Most of the time, you won’t get what the error is. In reality, the issue is simple and can be easily rectified.
Methods to fix the error
This section gives you two different methods to rectify the index.php error. The first method is to change the location where the website looks for the file. The second method involves switching the extension file from “‘PHP” to text format.
Method 1: Editing the file httpd-vhosts.conf file
This method for solving the error looks very simple because you need to change just a single line in a file. The file name is “httpd-vhosts.conf” which is located in the folder “C:\xampp\apache\conf\extra\httpd-vhosts.conf”.
If you’re using a Mac system then the path will be different. The below is the path:
“~/.bitnami/stackman/machines/xampp/volumes/root/etc/extra/httpd-vhosts.conf”.
The below are the steps to complete this method. They are,
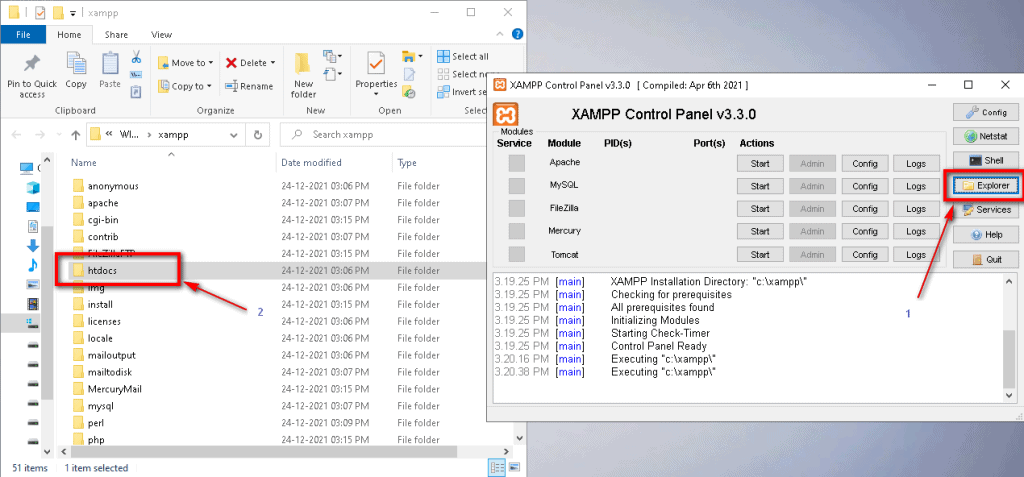
Step 1: Open the XAMPP control panel and just click on the button “Explorer”. This process will open a new window to edit the file mentioned above.

Step 2: If you like to navigate manually then navigate to the following directory link “C:\xampp\apache\conf\extra\httpd-vhosts.conf”.

Step 3: Now open the file ‘httpd-vhosts.conf’ using any editor. Then traverse to the “Virtual Hosts” location.

Now modify the document root section alone. It should show the exact location of your website. Refer to the below image.

Method 2:
The second method is just to change the file extension from PHP to txt format. This step is very easy because the extension can be easily modified.
Step 1: First open “XAMPP Control Panel” and then click on the “Explorer” button. Now you will get the folder opened and find the folder named “htdocs”.

Step 2: Now open the folder ‘htdocs’ and find the file named ‘index.php’.

Step 3: Just change the file extension from “.php” to “.txt”.

Summary:
I hope the solution will help you in solving the index.php error. This error is common when you use XAMPP for testing your website. However, the error may frustrate you but don’t worry this article will help you to bounce back from this error.
Hope you like our post, Fix the XAMPP localhost index.php Error. You can follow us on Facebook and Twitter to get the latest updates.
