Are you a Web developer? Haven’t you wondered what XAMPP is? If you don’t know it yet, we will explain in detail what is XAMPP & Install XAMPP on your local computer.
XAMPP is an open-source software developed by Apache Friends. XAMPP software package contains Apache distributions for Apache server, MariaDB, PHP, and Perl. And it is basically local host or a local server. This local server works on your own desktop or laptop computer. The use of XAMPP is to test the clients or your website before uploading it to the remote web server. This XAMPP server software gives you a suitable environment for testing MYSQL, PHP, Apache, and Perl projects on the local computer.
The full form of XAMPP is X stands for Cross-platform, (A) Apache server, (M) MariaDB, (P) PHP, and (P) Perl. The Cross-platform usually means that it can run on any computer with any operating system.
Next MariaDB is the most famous database server and it is developed by the MYSQL team. PHP usually provides a space for web development. PHP is a server-side scripting language. And the last Perl is a programming language and is used to develop a web application.
The XAMPP installation process is very simple and fast. Once XAMPP is installed on your local computer it acts as a local server or localhost. You can test the websites before uploading them to the remote web server. This XAMPP server software gives you a suitable environment for testing MYSQL, PHP, Apache, and Perl applications on a local computer.
How to Use XAMPP for Development Process?
Once XAMPP installation is completed you can start and stop each module by using the XAMPP Control Panel. For example, by testing PHP applications on your computer, you can start the two modules Apache and MySQL. It will allow PHP programs to run on your computer. This XAMPP software emulates a remote server-like environment on your local computer.
As an app developer, you need to test applications as many times as possible to find and fix the bugs. If you are testing in a local environment like XAMPP, it will speed up your development process.
Before XAMPP every time you need to upload files to a remote server for testing purposes. It will be quite difficult to test on the live server and it is visible to your visitors. But whereas in XAMPP you can easily test and make any updates in your localhost. At any number of times, you can update and test in XAMPP. Once completed you can upload these new updated files to the remote server.
What are the Main Tools of XAMPP and its definition?
XAMPP contains tools such as Apache, MYSQL, PHP, and Perl. We will see these tools.
Apache server is open-source free software that is initially developed by a group of software developers and now it is maintained by Apache software foundation. Apache HTTP is a remote server(computer) if someone requests files, images, or documents using their browser they will serve those files to clients using HTTP servers. Mainly hosting companies use this application to create a VPS server and shared hosting for their clients.
MYSQL is open-source software. It is actually a relational database management system(RDBMS). This SQL stands for Structured Query Language. It is the most popular and best RDBMS used for developing a variety of web-based software applications. With the help of MYSQL, it is possible to organize the information, manage, retrieve, and update the data whenever you wish to do it.
The full form of PHP is Hypertext Preprocessor. It is a server-side scripting language that helps you to create dynamic websites. This language is mainly used to build web-based software applications. It is open-source software and works fine with MYSQL. What actually happens is, the PHP code will be executed on the server and on the browser side its HTML code will be displayed.
Perl is usually said to be the general-purpose programming language. This Perl language is interpreted and highly dynamic. Actually, this language is used for web development, GUI development, system administration, etc. Perl is capable of working with HTML, XML, and other markup languages.
In the latest version of XAMPP, there are additional tools such as Mail server Mercury, OpenSSL, phpMyAdmin, etc. With the above tools, you can create a full-fledged desktop server.
Installation Process for XAMPP on Windows
XAMPP has been designed to be the easiest way to install and run a development server on your local computer. There are numerous other XAMPP like software available, but XAMPP is one of the most famous software.
In addition to Apache, MySQL, PHP, and Perl, XAMPP includes other really useful tools such as the phpMyAdmin database administration tool, FileZilla FTP server, Mercury mail server, and JSP server Tomcat. XAMPP can also install an administration site as the home page of the server.
From which you can undertake all manner of administrative tasks, such as checking the server status and security, launch tools like phpMyAdmin, and Webalizer analytics.
Steps to install XAMPP On Windows
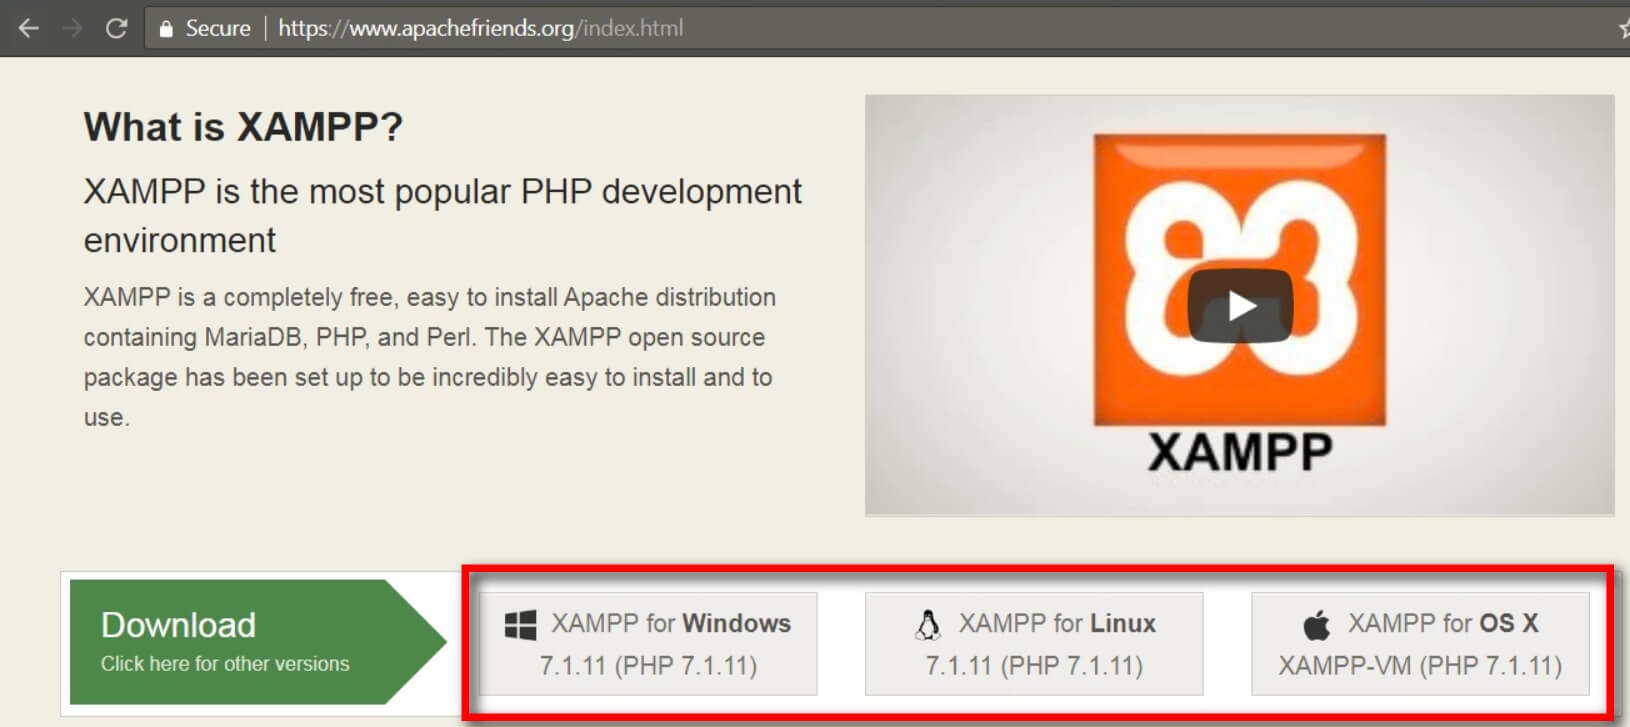
Step 1
In the web browser, You can easily download XAMPP from https://www.apachefriends.org/. Since it is open-source you can download it for free.
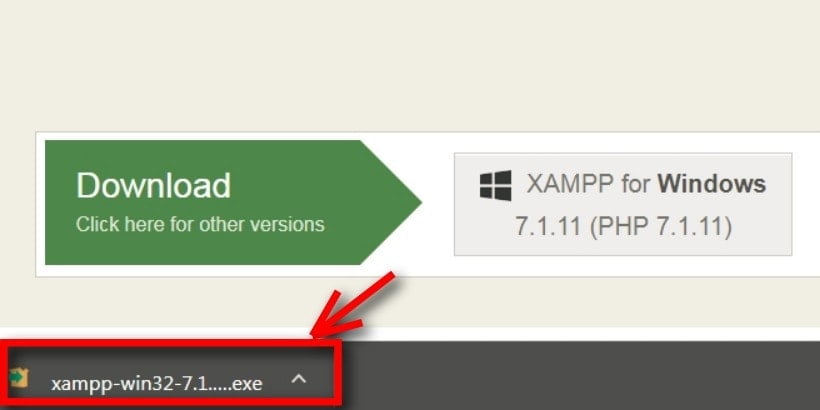
Step 2
Once the software is downloaded, you have to install it by double click the .exe file
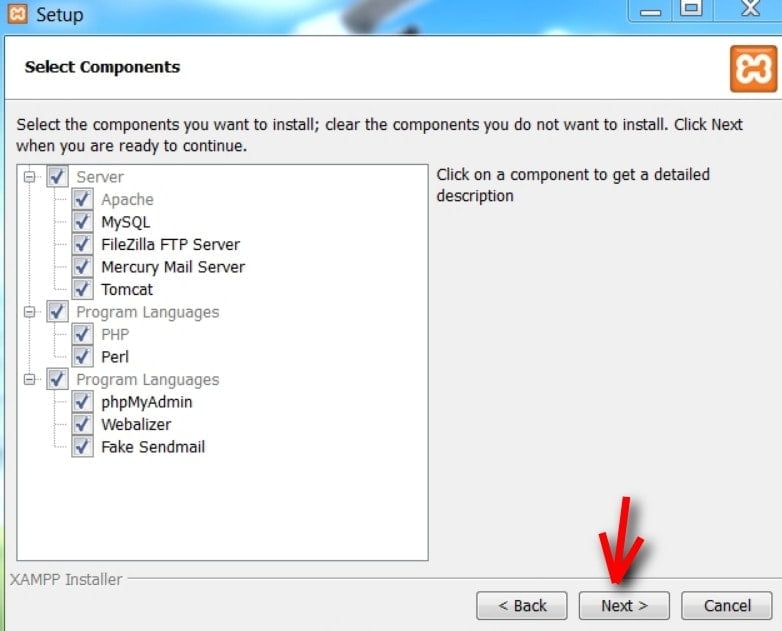
Step 3
Once the file is executed, a setup window appears. In the setup file, select the components that are required. For eg (if you want to install WordPress on XAMPP, the required components are MySQL, Apache, PHPMyAdmin).
Step 4
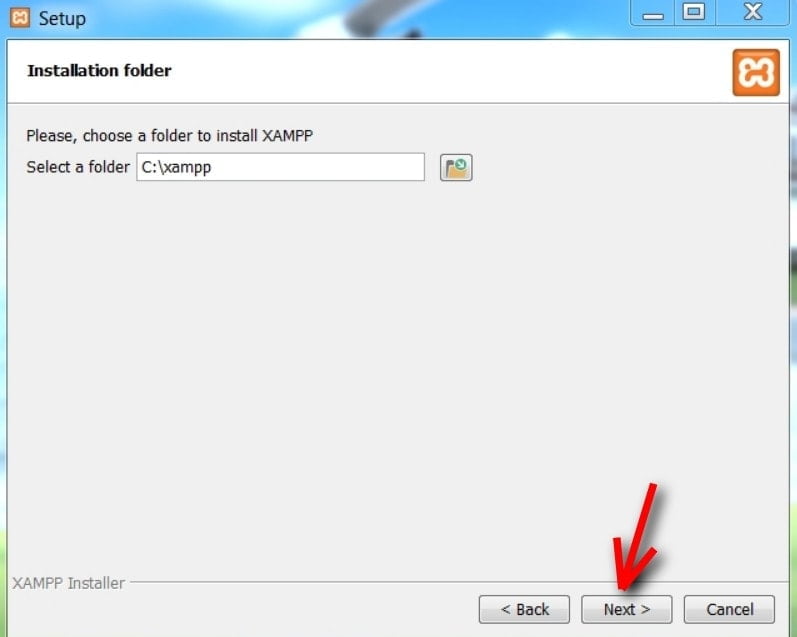
The next step is to choose the folder where the file is to be located. It is recommended to choose the default “C drive” and then click the “Next” button.
Step 5
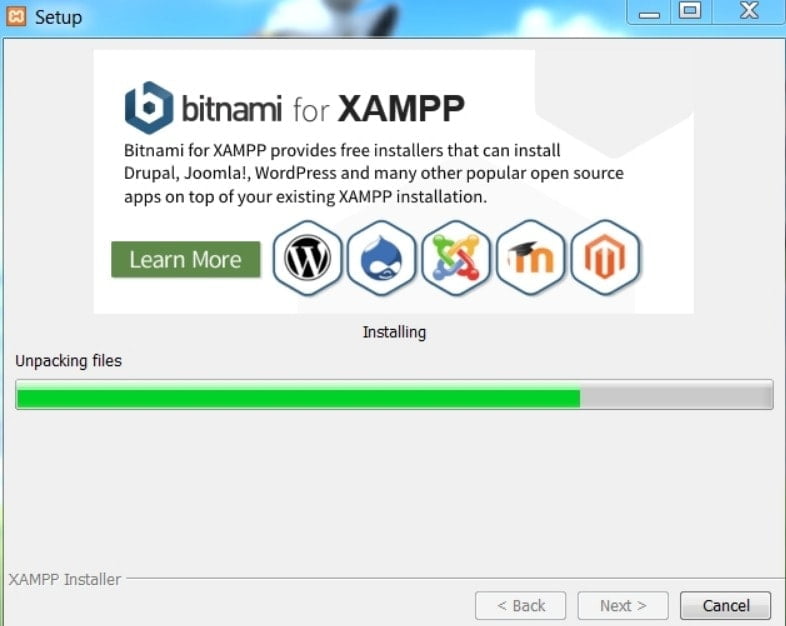
Clicking on the next your installation process will be started. The setup wizard will unpack and install all the selected components and will save them to their designated directory. The installation process takes a couple of minutes to complete.
Step 6
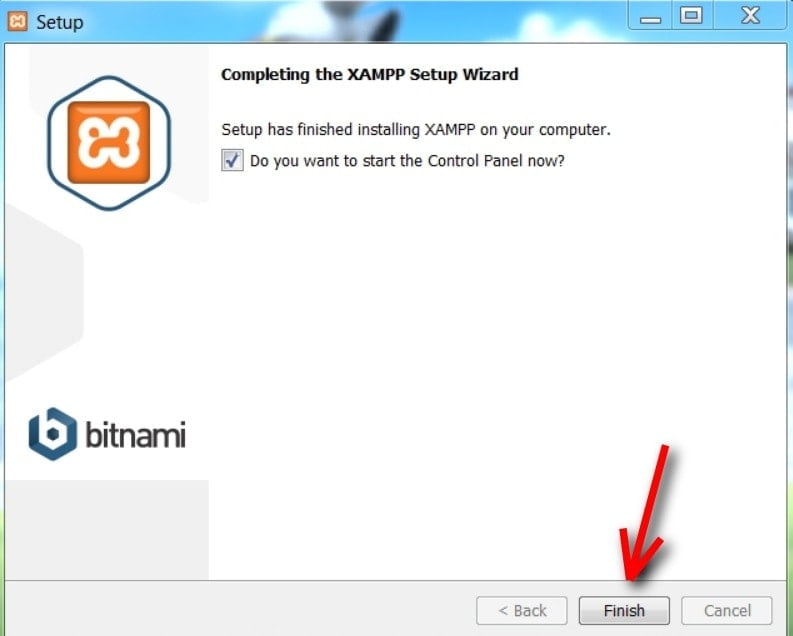
Once the installation process is completed, click on the “Finish” button.
Step 7
Once done, the XAMPP icon will appear on your desktop or start menu. By double-clicking the XAMPP icon, XAMPP control panel window appears.

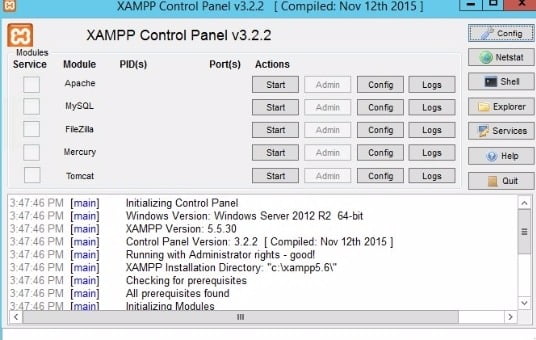
XAMPP Control Panel
In the control panel, you will be able to control individual components of your text server. Here you can start or stop individual modules by clicking the buttons below “Actions”. The control panel contains various buttons like config, net stat, shell, explorer, services, help, quit.
Config → It allows you to configure the XAMPP as well as the individual components
Netstat → Helps you to show all the currently running processes on the local system
Shell → It allows opening UNIX shell
Explorer → It will open the XAMPP folder in windows explorer
Services → Help to show all the services that are currently running in the back-end
Help → As the name implies it gives you links to the user forums
Quit → By clicking the button the XAMPP control panel will exit
Step 8
In the XAMPP control panel, click the necessary modules that are required for you to work. You can start the modules by clicking the “Start” button under “Actions”. You will be able to see the initiated modules highlighted in green. For example, if you are using the WordPress platform then the required components are Apache and MYSQL.
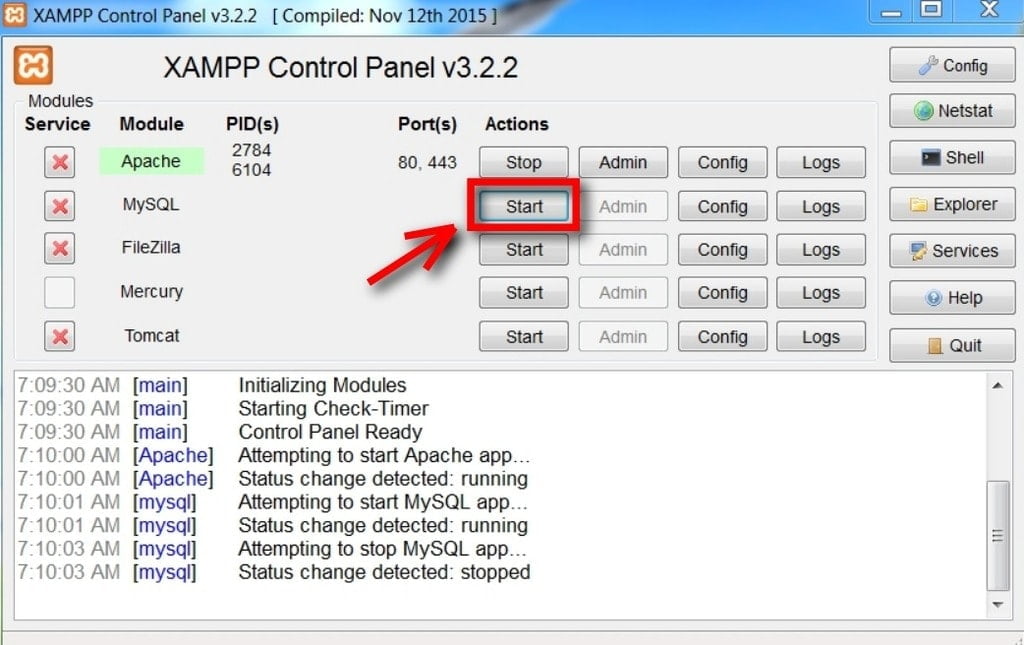
Note: If you cannot start a module as a result of the error, then it will be indicated with a red font. They will provide you with a detailed report to identify the cause of an error.
Step 9
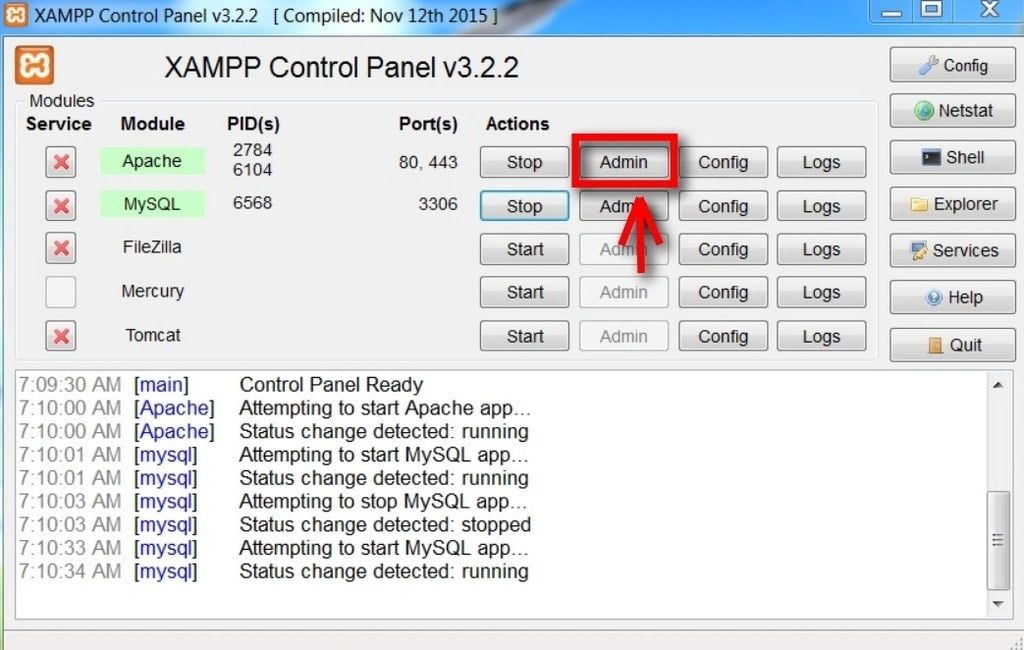
Then by clicking the Apache or any “Admin” button in the XAMPP control panel, you will be able to configure each module settings separately.
Step 10
That’s it, now in your web browser type localhost and you will be able to see a splash screen of XAMPP. Here you have to choose a language which you understand.

Step 11
By clicking the English button, you will be at the admin page of XAMPP.
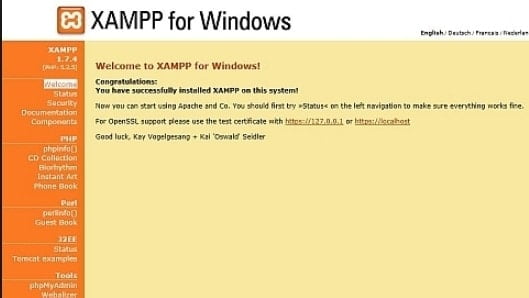
Now you have successfully installed XAMPP on your windows
Hope you get an idea of what is XAMPP & install XAMPP on your localhost. If you have any queries please feel free to comment on us. You can subscribe to us on Facebook and Twitter.
Good article but I have a query related to XAMPP. When I loaded XAMPP last week it contained MariaDB, not MySQL. Would that make a difference in the install of WordPress? I was trying to use the Bitnami install of WordPress after installing XAMPP and was getting error messages related to MYSQL. I ended up removing XAMPP and installing WAMP instead. Then I successfully installed WordPress, changing port 80 to port 8080.
HTTP can be purchased ?and if so how much?
Thanks for your comment. You can purchase HTTPS(SSL) from your hosting provider or try to install free open source HTTPS Lets Encrypt(Free) on your website. You can ask your website hosting provider whether they allow Lets Encrypt SSL or not.
Informative…Thank You!
Good artical informative for Students and Beginners…..Thanks