Every website owner will have the intention to improve the speed of their website and also to improve their SEO. Since the slowly loading website would create a bad impression among the customers. Also, demotivates the visitors to access the website further. So, it is better to follow some ideas available in the market to reduce the loading time of your websites by using significant caching. The caching of your website is nothing but storing the copy of your website in the server which would help in reducing the time in accessing your website database all the time.
There are many cache plugins available for WordPress which may reduce the time in loading the website. This review will be on the plugin called ‘Swift Performance caching’. So, the swift performance review will give you a clear idea about applying ‘Swift Performance‘ on your WordPress. Let us see how it helps in improving the website performance.
Swift Performance Plugin Review
Swift performance is an amazing cache plugin that would be loved by most website owners. It holds many unique features because that user does not need technical knowledge to use. Apart from providing a cache module, it just optimizes the CSS and JavaScript. Also, it holds the capability in optimizing the media files which gives the extraordinary loading speed. The following are the features of the Swift Performance plugin. They are,
- First, it combines CSS and JavaScript
- Optimize images on your website
- Server response time will be very less
- It removes query strings from resources like static
- Also, it increases the browser caching compression process
- Minify CSS files, JavaScript even HTML.
Still, now we have listed the outlined features of Swift performance. The below section gives you the detailed features of Swift performance that you are expecting.
Fast & Easy Setup
For all the plugin, the very first feature will be its installation process. This should be very simple because this will be the entry point for all application and plugins. So, you should not find any trouble while installing. This feature is successful in this plugin because it just has plug and plays functionality.
To install, just you need to download, install using setup wizard and activate your plugin on your website. Once the plugin is activated then you can start your work with a single click. The main advantage is that you don’ need any technical knowledge to install and activate.
Advanced Browser Caching
The Swift performance plugin will give you the advanced caching feature which in turn enables the AJAX and also allows the dynamic request to your website. The plugin holds intelligent caching techniques which give faster loading of the website for your visitors. Also, it continuously checks the server which has the content change request.
Instant reload will be made, if there is a change made in your website. This plugin enables quick content load without slowing down your website.
CDN Compatibility
You will get maximum CDN compatibility if you choose this plugin. The CDN compatibility feature allows you to select a specific hostname when it is a static resource. In addition to that, you can specify three different hosts for JavaScript, CSS and media.
Swift Performance Optimization
Database Optimization
The Swift performance is come up with database optimization. Before you doing database optimization, first you need to check whether you have any backup for your database, it’s mandatory. This feature shows how much the plugin gives us the safety alert to safeguard over the database. Once you have your backup, then click on the ‘I Have Backup’ option. Now the options for optimization will be enabled.

The database optimizer displays your database into various categories like General, Posts, comments and terms & users. The optimizer enables you to find the unwanted categories found in your database and you can clear that to optimize your website. The database optimization will give you the quick loading of the websites to your visitors.
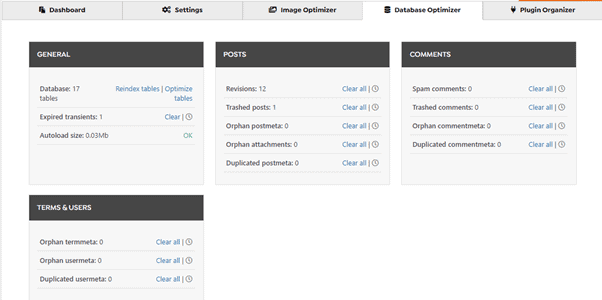
Image Optimization
The Swift Performance caching plugin will give you better optimization techniques to optimize the images on your website. The image will occupy more size in your database which may affect the effective loading of the website. So, the correct optimization of the image would give you the quick loading of the website.
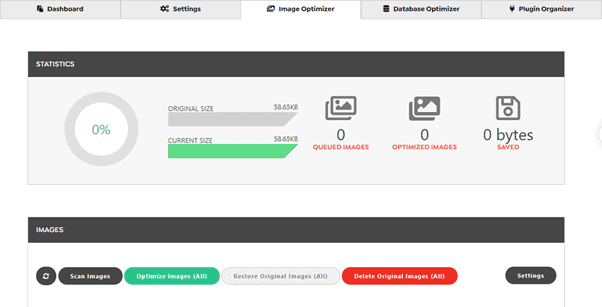
The screen above gives you the complete details about the image size of your website under the statistics tab. If you optimized any images then the original size and current size may get differ.
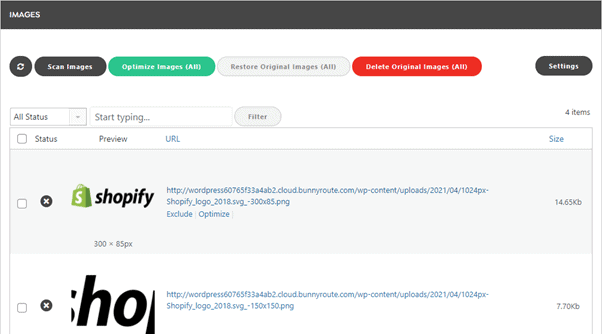
The images tab list all the images on the website and give you the option to optimize those images in a click or individually. Also, it offers a lazy load feature for images and videos, it just loads the textual content first then image and video files. This option would compromise the user experience. videos where it loads web contents before the image and video files. The main advantage is that it compromises the user experiences.
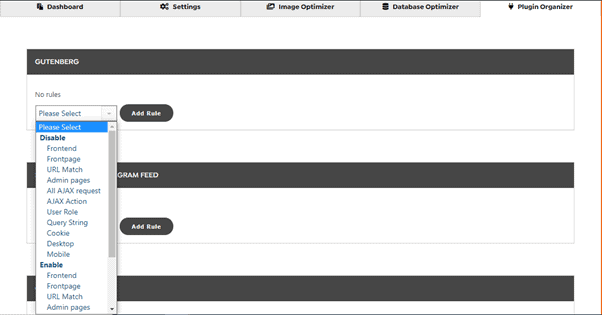
Plugin organizer
You may have many plugins enabled in your WordPress, some plugins may not be frequently used. This Plugin organizer feature in Swift Performance will give you the option to organize all the plugins by enabling or disabling them. With Plugin organizer, you can disable the plugins on certain pages and run the plugin on certain pages. It allows setting enable or disable in front-end, Admin pages, AJAX action rules, etc.
The plugin organizer makes it easy for you to easily disable or enable the plugins which are not in use. Thereby it frees the storage space to reduce the website loading time.
Optimizing CSS and JavaScript
Apart from providing minification for Images and videos, it is important to focus on other options. The Swift Performance will work on optimizing both critical CSS files and JavaScript and combining gives the critical CSS for your page. It creates the critical CSS for all the web pages available on your website.
The main advantage in this optimization, the Swift Performance will contain the rules which are implemented on the web page. It enables you to inline and merges the critical CSS with other files easily.
Settings
The settings tab gives you many additional features that could be enabled for managing the website efficiently. The settings are categorized into many terms they are General, Media, Optimization, caching, plugins, CDN and export/import. Let us see one by one in this review. You will just admire these settings.
General
General Settings
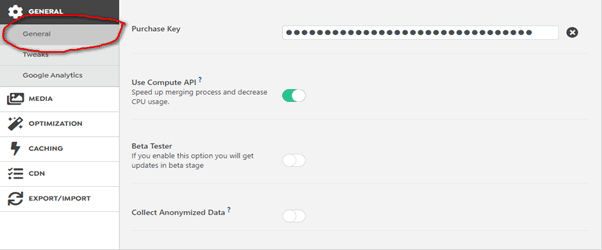
Use Compute API – By enabling this the overall speed of the website will get increased. This option will merge or reduce the CPU usage and help in loading the website faster than usual.
Beta Tester – It gives you the notification regarding the version updates during the testing phases.
Collect Anonymized data – It collects the following data like PHP version, server software, active plugins, active theme, total pages, total posts (including custom post types), total images.
Tweaks

The swift performance will add rules to the .htaccess at the beginning of the file. So, if you need to give any rule then you can go with this option. The rules can be added to the .htaccess file on the black screen on the side of the option.
Google Analytics

If you enable the option ‘Bypass Google Analytics’, it just blocks the default google analytics script and enables the AJAX request and the Google Analytics Measurement Protocol.
Media
General Settings

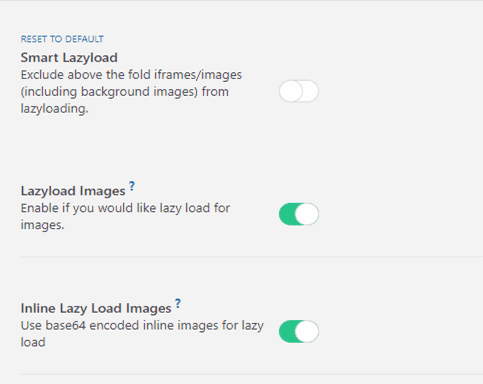
The smart Lazyload excludes the images, iframes while initial loading which means it first loads the content and then images.
Images
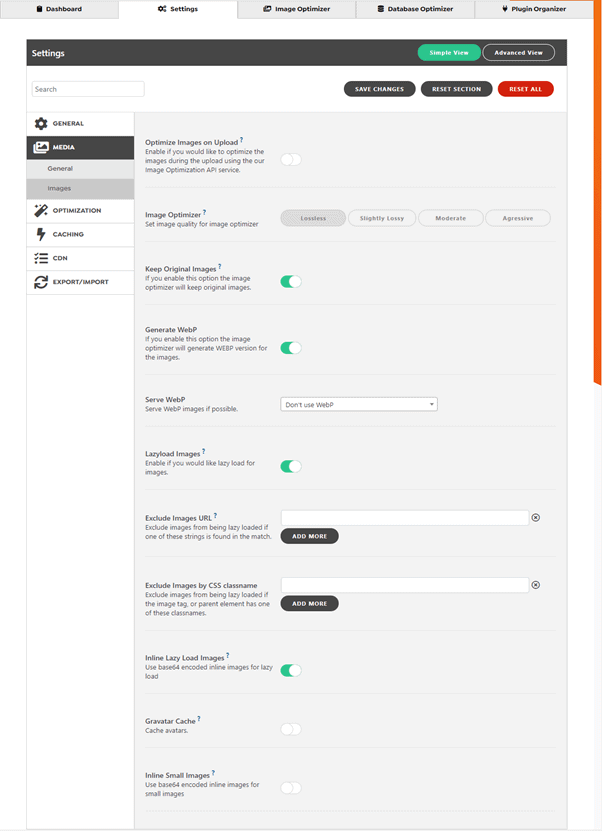
Optimize Images on Upload – This option will reduce the size of the image while uploading the image to the server. You can also choose the image to optimize quality like lossless, slightly lossy, moderate and aggressive.
Keep Original Images – Enable this option all the time, this would help you in reverting time.
Generate and Serve Webp – This option will generate a WebP version of the image also you can serve the WebP if needed.
Lazy Load images – If you enable this, then the images will load after the content.
Exclude images by URL and class name – Avoid particular images or class name from Lazyload by using these options.
Inline Lazy Load Images – Using this you can inline the low-quality images to your website. This would reduce the number of requests.
Gravatar cache – WordPress will use Gravatar for avatars which may increase the loading time. So, if you enable the gravatar cache, then WordPress will store avatars in the cache which will reduce the loading time.
Inline Small images – The small images can be inline into the website which may reduce the loading time of your website and minimizes the HTTP requests.
Optimization
General Settings
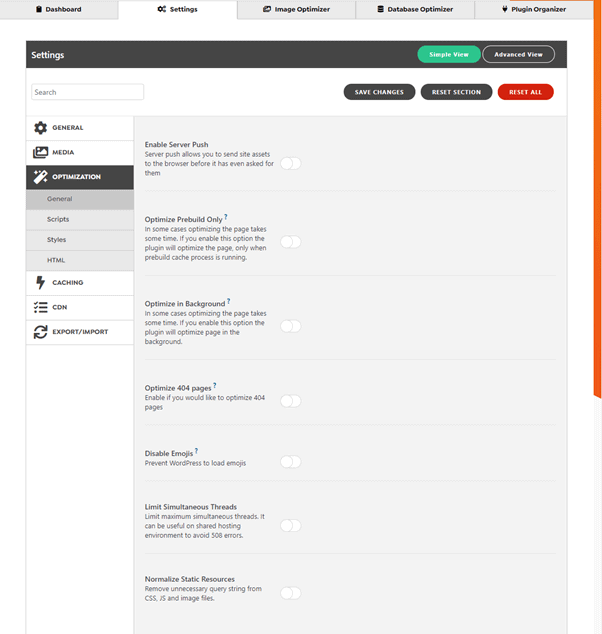
Enable Server Push – The server push will allow sending server assets to the browser before it asked for the assets. This may increase the speed of loading.
Optimize Prebuild only – It optimizes the page only when the prebuild cache process is running.
Optimize in Background – The optimization process will be done in the background. This option is recommended to get enabled for the first visit that means before the cache is filled.
Optimize 404 pages – Enabling this option is not encouraged because it is not necessary to optimize 404 pages. To save your server database disable this option.
Disable Emojis – Requests for loading the emojis will be reduced until it is enabled because WordPress will load the emojis as default.
Limit Simultaneous Threats – This option is useful for shared hosting to avoid 508 errors.
Scripts
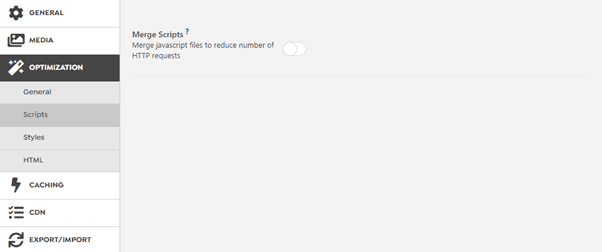
The merge script options will reduce the number of requests to the server by merging java scripts. Also, enabling this option, the server will store some resources on the server-side to reduce the requests all the time to the server.
Styles
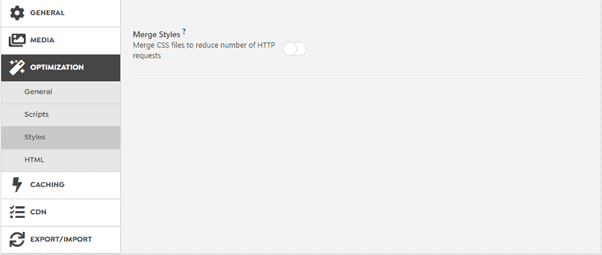
Here the CSS style file will be merged to reduce the requests to the server. Also, stores some of the resources in the server to reduce the requests.
HTML
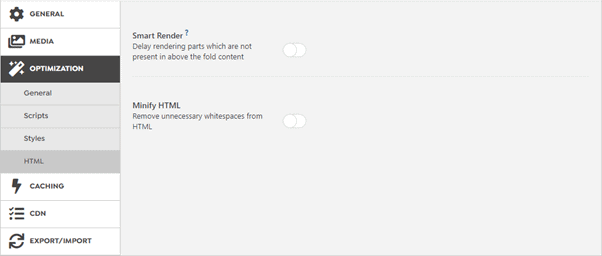
Smart Render – Automatically set content visibility, and set the size of the placeholder for containers that are not present above the fold content.
Minify HTML – The unwanted whitespace in the HTML will be removed.
Caching
General Settings
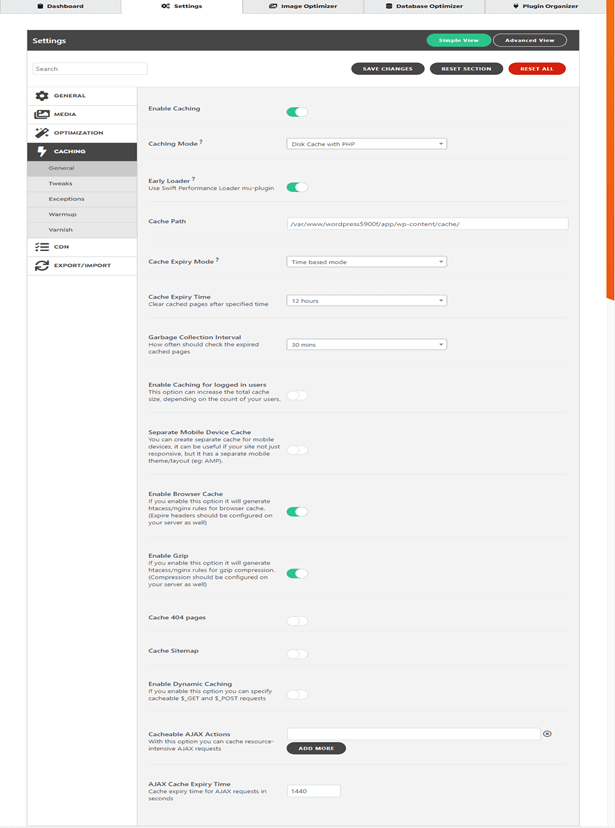
Caching is the base to improve the speed of loading a website for the viewers. So, I recommend you enable caching and be keen on the options you selected.
Caching Mode – There is three option available and I prefer you to choose ‘Disk Cache with Rewrites’.
Early Loader – Enable this you will get the best speed in website loading.
Cache Path – The place where the web cache will be stored.
Cache Expiry mode – There are two options time and action-based mode. My opinion is ‘Action based mode’.
Clear Expiry Time – The pages in the cache will get expired after the specified time.
Garbage Collection interval – The pages inside the cache after its specified time will be considered as garbage. You can give the time interval to collect those garbages.
Enabling Cache for the logged user – This option may increase the cache size and it depends on the number of users logged in.
Separate Mobile device cache – Creating a separate cache for mobile devices, will be used when your site not responsive.
Enable browser cache – By enabling the browser cache it will generate htaccess/Nginx rules for the cache.
Enable Gzip – It will enable htaccess/Nginx rules for Gzip compression.
In addition to these features, you can also cache 404 pages, sitemap, enable dynamic caching and you can also cache the intensive AJAX caches along with the time expiry option.
Caching Tweaks Settings
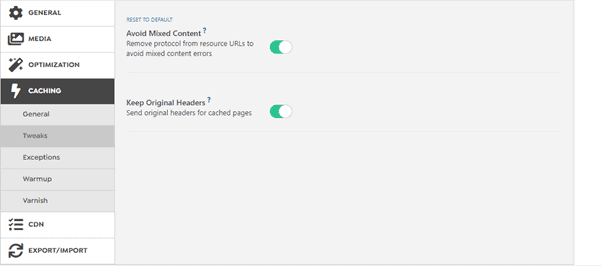
Avoid Mixed content – Your browser may load HTTP or HTTPS which may cause the mixed content error. To avoid the error, just enable this option. It removes all protocols and uses only HTTPS alone.
Keep Original headers – If a plugin sends a custom header, then you can cache them by enabling this option.
Exceptions

Here, you can mention the post name, pages, URLs, cookies content parts, user agents, crawlers and author pages which should be excluded from caching. So, based on this you can avoid unwanted caching all the things.
Warmup

Prebuild Cache Automatically – It warms the cache automatically it’s been cleared. Disable when the server becomes overloaded.
Prebuild Author Pages – Most of the time, the author page will not be viewed. If it is viewed often then just enable this option.
Prebuild Archive – If your blog changes regularly and visited often, then enable and prebuild it.
Prebuild REST URLs and Feed – Leave this unchecked.
Varnish
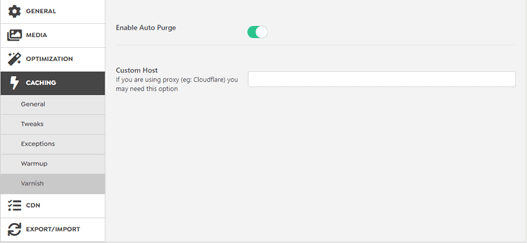
Enable Auto Purge – If you want to clear the varnish cache then just enable the option. the varnish cache will be cleared when the swift cache is cleared.
Custom Host – Need to mention varnish IP, if you use a proxy server like Cloudflare.
CDN
General Settings
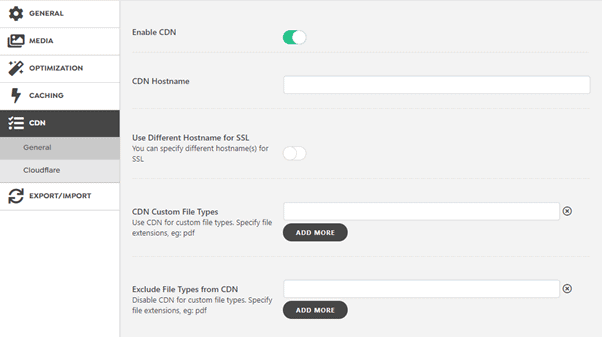
Enable CDN – By enabling this option, it purges the CDN cache.
CDN Hostname – Give the hostname alone and don’t mention prefixes like HTTPS or www.
Additional, to this option you can include the file types which should be cached or file types to be excluded from caching.
Cloudflare
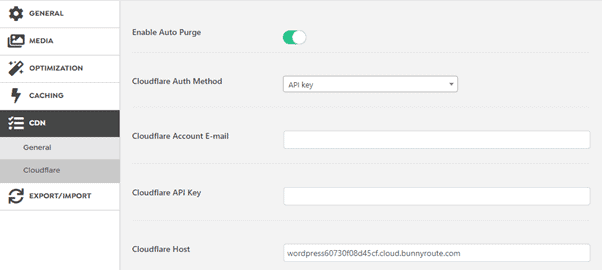
Enable Auto Purge – It clears the Cloudflare cache once the swift cache is cleared.
In addition to this, you can mention the authentication method, account mail, API key.
Conclusion
I think this Swift Performance review would be given you a clear idea of the Swift performance plugin. We assure you about the best performance of the Swift Performance because caching has become a part of the website. So, in order to use your website loading time and effective use of caching then you can go with this Swift Performance. Also, this tool gives you the best SEO rankings.
Hope you like the Swift Performance plugin review. If you have any queries please feel free to comment on us. You can subscribe to us on Facebook and Twitter.