In this post, I will show you How to Translate WordPress using TranslatePress? Hope you know that WordPress can set up and use in multiple languages. You can create a multilingual website with WordPress by translating your complete content into different languages. If you wish to create a multilingual WordPress website then go for an easy to use translation plugin.
In the WordPress repository, you will plenty of translation plugins. But the best among them is TranslatePress. In this post, we will show you how to easily translate your WordPress with TranslatePress.
TranslatePress
TranslatePress is the most powerful, and best translation plugin for WordPress. It lets you translate your website into any language right from the front end editor that works similar to the customization. You can easily translate using TranslatePress plugin without having any programming knowledge. The plugin’s interface allows you to translate the entire page at once, even the output from shortcodes, forms, and page builders.
Using this plugin you can create a multilingual site very fast and effective. This plugin uses the Google Translation API to automatically translate the strings. Then later the strings can be modified manually. TranslatePress is a freemium plugin which comes with both free as well as paid version.
The free version will allow you to translate in only one language whereas in the paid version you can translate into unlimited languages and SEO support for the multilingual website. The premium version comes with three pricing plans such as Personal, Business, and Developer.
A personal plan can be used for 1 site with a pricing $79/year, then the Business plan can be used up to 3 sites with a pricing $139/year, and Developer plan comes with a pricing of $199/year and can be used for unlimited websites. Using this plugin you can instantly switch languages from the live editor.
Features
- Machine and Human Translation combined
- WordPress Translation UI
- Multilingual site SEO
- Dynamic String Translation
- 100% Support
- Proper setting of HTML lang attributes
- Compatible with all the plugins and themes
- Support for both manual and automatic translations
- Ability to translate dynamic string added by themes and plugins
- Facebook and Twitter social graph information translation and much more
Translating WordPress with TranslatePress
The first step to be taken is to download and activate the TranslatePress plugin on your website.
You have to create a TranslatePress account before using it, then only you will able to get your unique key and use it on your website.
Upon activation, if you wish to translate your website for more than one language, then additionally you have to install ‘Extra Languages’ add-on in the admin panel. You can easily download addons button which is under your account on TranslatePress website.
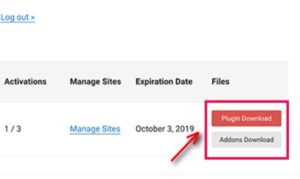
After downloading the add-on, you have to install and activate this add-on just like the other plugins. Once it is done, Navigate to Dashboard > Settings > TranslatePress to configure the plugin.
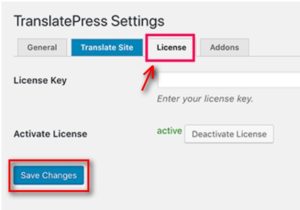
Now you have to switch to license tab and have to enter your license key. This key will be available under your account on the TranslatePress website. Then move to General setting tab to configure rest of the settings.
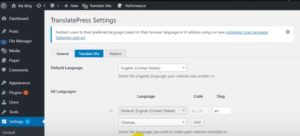
In the General tab, the first option is to select the “default language” for your website. Then in the “all Languages” option, you have to choose the languages that you want to translate your website into. You can add how much ever languages you want to translate.
Then you have chosen ‘yes’ or ‘no’ in the native language name field. This field states that whether you want to display language names in the native language. The default option will be ‘No’ which states that the language names will be shown.
Then the next field is “Use subdirectory for default language”, in this field you have to choose whether you want to display the default language name in the URL as a subdirectory.
Example ggg.com/en. The slug at the end of URL will change according to the language you selected. The default option is “No” and you can leave this setting as such in order to gain the best SEO.


Then the next setting is “Force language in custom links”. The default option is “Yes” in this field. It is good to keep the default settings as such because that will change custom links for translated languages and make the URLs SEO friendly.
Then comes the next option “Google Translate”, here the default option is “No” but you can change the option if you wish to use the Google Translate for automatic translations. In the next text field, you have to enter the Google Translate API key, by clicking the link below that text field you will be able to get instruction on how to get Google Translate API key.
Then the final settings option is “Language Switcher”, which enables you an option of how to display the language switcher on your website. It comes with three choices such as shortcode, menu item, and floating language selection. You can select the options and click the “Save changes” button to save all your settings.
Translate your website content
Once if you set up the plugin, then the translation process is easy. To translate to your website, you have to click the “Translate Site” tab in your plugins setting page or you will find a button in your WordPress dashboard.

By clicking on the button it will lead to the live translation editor in a new tab. Then working in the live editor, you can click on any text that is present in your website on the right column, that the TranslatePress will automatically load the text in the left column to translate.


Then in the left column, you have to click on to the language which you want the string to translate and then enter your translation. Once done, click on the “Save Translation” button at the top to save all your settings and then click the “Next” button. Now the TranslatePress plugin will automatically load the next string on the page for you to translate.
You can even choose the strings from the drop-down menu which is below the default language. Once you click on the drop down menu it will list you translation text strings on the page. Then you can select the string from the list and provide its translation.

You will be able to translate all the contents present on your website. This includes buttons, menus, meta text, sidebar widgets, and much more. You can start translating any page on your website by clicking on the links present on the screen.
Now the TranslatePress plugin will allow you to instantly translate any post or page on your website when you are logged in. In order to enter the live editor, you have press the “Translate Page” button which is at the top of the screen.

Once the string is translated the TranslatePress plugin will automatically translate it on all other places. This plugin makes your task simple and easy. Now the next step is that you want to know how to add a language switcher to your website?
Adding Language switcher to your website?
Language switcher lets your website visitors select the particular language when they visit your website. Usually, it will be displayed with the flag of each country to represent their language which is available on your website. The
TranslatePress plugin as already mentioned it allows you to add language switcher with three option such as shortcode, navigation menu and floating. You will be able to display the language switcher as a language name, flag, or both.
Language switcher using the shortcode
You have the add the code [language-switcher] to your posts, pages, or sidebar where you wish to display the language switcher on your website.
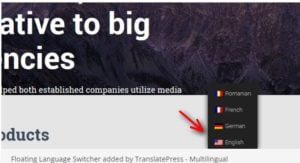
Language switcher using the navigation menu
You have to navigate to Dashboard>Appearance>Menus page and then click on the “Language switcher” tab which is present on the left side. You have to select the languages which you wish to display on your website and then click on “Add to Menu” button.
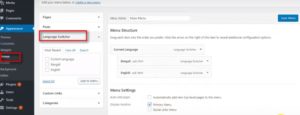
Now you will be able to see all the languages which you have selected will be added to your navigation menus. Finally, click on the “Save Menu” button to save your settings.

Language switcher using floating
Here you have to navigate to plugins setting page and you will find the language switcher section. You have to just tick the box which is near the option “Floating language selection”.
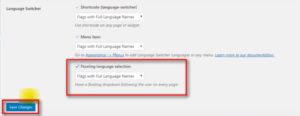
Once done click on the “Save changes” button to save all the changes made. You can now visit your website and check for the floating language switcher which is available.
That’s it, you have translated your WordPress with TranslatePress. It is very easy and flexible even beginners can make use of this plugin and explore their website to any language they wish.

TranslatePress Back-end Process
All the translations created with this plugin are stored in the database. This plugin will create one database table for each language pair. (for example English-French) and will create one text table for each specific language such as one for English and one for French.
You will never find any translations inside your WordPress admin panel. Also, you cannot export the translations as PO and Mo files. Until unless TranslatePress is running on your website you will never be able to access the translation from your front-end editor. A translatepress team is now working on to add more add-on features for proper data export.
Conclusion
TranslatePress seems to be a wonderful translation plugin that helps you to translate your WordPress website very easily. Working with this plugin you need not even touch any single piece of code. You can even translate dynamic text, plugins, themes, and any strings stored.
TranslatePress integrates well with WooCommerce and you can translate your online store into any language you want. This plugin offers you a front-end editing feature which is lively and great to use. The only backdrop of this plugin is some improvements need to done for export and import translations.
Hope you understood about how to easily translate your WordPress with TranslatePress. If you have any queries or suggestions please feel free to comment to us. You can subscribe to us at Facebook and Twitter.

yes yes yes! I have the right plugin now! thankyou!