If you want to know the correct way to fix the 413 request entity too large error in WordPress. Am sure this article will definitely help you. This error usually occurs when you are trying to upload a file, which is larger than the upload limit of your WordPress website.
In that case, the web server fails to upload the file and you get this error. Mostly all the WordPress hosting providers have configured the server so that they can easily upload large size files. In some cases, the server settings may not be high enough to upload large size themes or plugins.
In that server, you will get an error message of file size exceeds the maximum upload limit. There are numerous methods to fix the 413 request entity too large error in WordPress.
Methods to fix the 413 request entity too large error in WordPress
Method 1: Increase upload file size limit via .htaccess file
You need to edit the .htaccess file by adding the following lines of code at the bottom
Php_value upload_max_filesize 64M
Php_value post_max_size 64M
Php_value max_execution_time 300
Php_value max_input_time 300
Method 2: Increase upload file size limit via functions file
You will need to add the following files of code to your themes function.php file or a site-specific plugin
@ini_set(‘upload_max_size’, ‘64M’);
@ini_set(‘post_max_size’, ‘64M’);
@ini_set(‘max_execution_time’, ‘300’);
You will be able to increase the values in upload_max_size and post_max_size more than the file you are trying to upload. You can also increase the max_execution_time you think it would take to upload the file. If you are not sure, then you can try doubling the value.
Methods 3: Increase upload the file size limit via php.ini file
If the previous methods dint solve your problem then consider this method by adding the following lines of code in the php.ini file located in your root directory
upload_max_filesize=64M
post_max_size=64M
max_execution_time=300
Method 4: Manually upload file size limit via WordPress file
In case if your service provider dint allow you to access the php.ini file, then add the following lines of code in wp-config.php, themes function.php file etc
site-specific plugin
@ini_set(‘upload_max_size’, ‘64MB’);
@ini_set(‘post_max_size’, ‘64MB’);
@ini_set(‘memory_limit’, ‘300MB’);
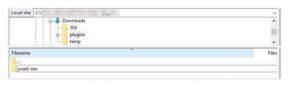
Method 5: Manually upload file size limit via FTP
If none of the above methods works, then you must consider uploading the file manually via FTP. Uploading the files in WordPress usually comes with three categories such as plugins, themes, and media files.
Uploading media files, you need to work with plenty of images. With the help of FTP, you will be able to queue multiple uploads and downloads without any error, you can pause them, and resume whenever they are in need. In order to upload plugins and themes in WordPress via FTP, move to wp-content directory.
Inside the directory, find the plugins and themes folder. Each plugin and themes installed on your website will be in an individual folder.
Now you have a zipped file for a plugin or theme that you should upload.

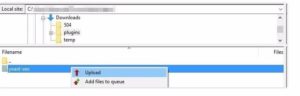
Now zip the contents locally, which will give you a single folder in each case. Then to upload it, move to its local location within your FTP client, using the section to the left of your websites folder.
If you have placed the folder you want to upload, move to either the plugins or themes folder within your wp-content folder. Now, it’s easy, you can just drag and drop the folder you want to upload to the folder or right click on it and select the upload option. Now the FileZilla will transfer those files.
Uploading might take some time, depending on your network speed and the size of the file. Once there are no items left under the Queued files tab, you can close the FTP client.
Next is to upload the media files to WordPress. This file contains all the images, videos, audios, and other types of media files stored under the wp-content/upload folder. Inside the folder, you will notice a number of folders. But WordPress will automatically organize the content as per the month and year you uploaded it. With this way, you can easily find the files you want.
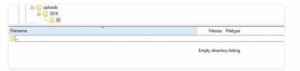
You can just navigate to the current year and month within your uploads directory to upload the media files via FTP. then you can also upload the plugin or theme and wait until all the files are transferred. Finally moving to your dashboard, all the uploaded files will be ready to use.
Conclusion
These are the common methods of fixing the 413 request entity too large error in WordPress. There is numerous method to troubleshoot this error. But with these common methods itself, you will be able to troubleshoot it. If you are not able to do it, then immediately contact your service provider to sort it out.
Hope you understood about how to fix the 413 request entity too large error in WordPress. If you have any queries or come up with other easy methods, please share it with us. So that it will be useful for upcoming readers. You can subscribe to us on Facebook and Twitter.