
Do you want to know how to add Query Monitor on your website? You are at the right place, in this post we will show you how to add a Query Monitor on your WordPress website. When you load a website, plenty of things happens at the back-end. A lot of queries will be sent to your database to get particular information.
WordPress by default will never keep track of these queries and monitor the process. In order to check your WordPress website, performance Query Monitor plugin came into existence. With the help of this plugin, you will be able to monitor all the queries that are made to your database and helps you to check about the resources you are using.
Query Monitor
Query Monitor is basically a plugin in WordPress developed by John Blackbourn. This plugin currently boasts with nearly 60k active installs and widely used all over the world. You can find this plugin in the official WordPress repository. It is a free debugging and development plugin for WordPress.
Helps you to identify and rectify slow database queries, REST API requests, AJAX calls, and much more. This tool monitors your WordPress website to request on the server. The plugin will also be able to report the back-end details such as hosting environment details, script dependencies, and dependants, conditional query tags met by the current page, WordPress hooks that fired during page generation etc.
This plugin will monitor each and every transaction that takes place on the server or between the server and visitors browser, while your web page is generated. All the gathered information will display as a report on the footer of your web page. It provides a lot of information about the WordPress queries and plugins are performing.
With the help of this information, you can check the issues with the code running on your website. This plugin includes features such as HTTP requests, languages, hooks, redirects, environment information, User capability checks, scripts & styles etc.
Adding Query Monitor on your website
Step 1: Initially install and activate the Query Monitor plugin. You can download and install the plugin from the official WordPress repository or directly through your WordPress dashboard.
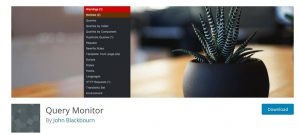
Step 2: Once the plugin is activated, you will be able to see the Query Monitor menu in your WordPress admin panel.

Step 3: Hovering your mouse on the Query Monitor will display the menu allow you to jump to a parameter. You can even click the Query Monitor stats to view all the data.
Viewing data in Query Monitor
Step 1: At the beginning, you have to be sure that the WordPress admin bar is visible when you are viewing your website. If not, move to Users >Your profile and then you have the tick the checkbox next to the option “Show Toolbar when viewing site”.
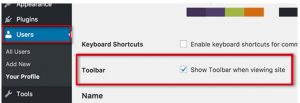
Step 2: Once done click the “Update profile” button to update your settings.
Step 3: Then you have to move to the page you want to check the queries for. To move the page, you can simply drag the mouse to the Query Monitor menu and you can select the section you want to view.
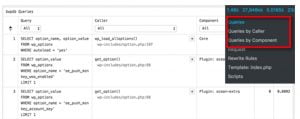
Monitoring SQL Queries
With the help of this plugin, you can monitor all the SQL queries, queries by a caller, and queries by component. The queries by caller section will display all your queries that are called and especially who called them by a custom code and where the code is located. The queries by component section will display all your queries by plugins, themes, and WordPress core files are making.
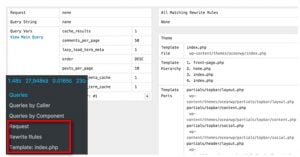
Rewrite rules and templates
Rewrite rules and templates section will display matching rewrite rules and templates used to display your current page.
Scripts & Styles
This section will show you the JavaScript and stylesheets loaded by the theme and plugins. You will also be able to see where these files are actually loaded from whether it is from header or footer.

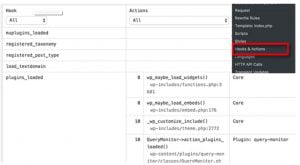
Hooks and Actions
Hooks and Actions section displays the hooks used and the actions triggered while loading your current page.
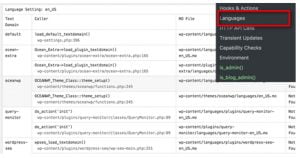
Languages
Languages section helps you to track where and which language files are requested and loaded by the current page. If you are running a multilingual WordPress website, then this feature helps you to identify which theme and plugins have language files.
HTTP API Calls
HTTP API Calls section will display all the third party API calls made through your website.
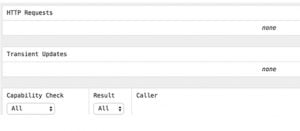
Transient Updates
This section is used by the developers to store information on your WordPress database with an expiration time. It will display the transient updates requested when the current page is loaded.
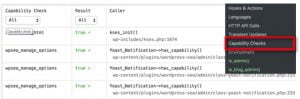
Capability checks
Capability checks section helps to display user role capabilities run by WordPress core files, plugins, and theme when loading the current page.
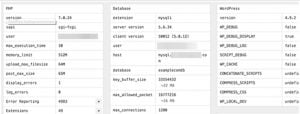
Environment
Environment section displays all of your website’s hosting environment information. The environment information such as MySQL version, PHP version, WordPress database name, MySQL host, and much more.
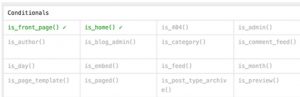
Conditional checks
Conditional checks section displays conditions that are required to display the current page view.
Hope you understood how to add a WordPress Query Monitor on your website. If you have any queries or suggestions please feel free to comment on us. That will help us to improve upcoming articles. You can subscribe to us on Facebook and Twitter.
Love your resources! I appreciate your details and depth writing style and all your eye cache points was so awesome.
Thanks for writing a resourceful article on adding WordPress Query Monitor on website.Probably the best article I have read so far. You explained very politely with images which make it more easier to understand. I got a clear idea about WordPress Query Monitor.