
Before knowing how to setup Cloudflare, initially we have to know about Cloudflare for better understanding. So first let me give you a short introduction about Cloudflare.
CloudFlare is a company that gives services such as Content Delivery Network (CDN), Security, Domain Name Server (DNS), DDoS Protection. It mainly concentrates to increase the network performance and security of your website. Cloudflare caches the static content of your website and delivers the result in a much faster way.
It will download all the static content of your website to its server and the server display the result to your website visitors very quickly. CloudFlare is distributed all around the world and nearly has 151 data centers. If your website is added or enabled with CloudFlare, then the browser starts loading a static page and the request is given to the server.

It automatically identifies the visitors and serves them the content to its nearest data center. By serving them with the nearest data center, the loading time of the site will be extremely fast. Since your website loads fast, Google ranking will increase. CloudFlare is good in providing security to your WordPress website.
It has an advantage of knowing your webs traffic and it can filter out in many ways. It has the ability to block the spammers trying to inject your website. As an extra quality, it has effective image optimization.CloudFlare is available in premium as well as free version. A free version will be suitable only for small websites. If your website is quite large then you can go for a premium version.
How to setup CloudFlare for your WordPress website?
There are mainly two ways to setup Cloudflare for your website. One is you can directly setup from the Cpanel and the other way is that you can setup from the CloudFlare page.
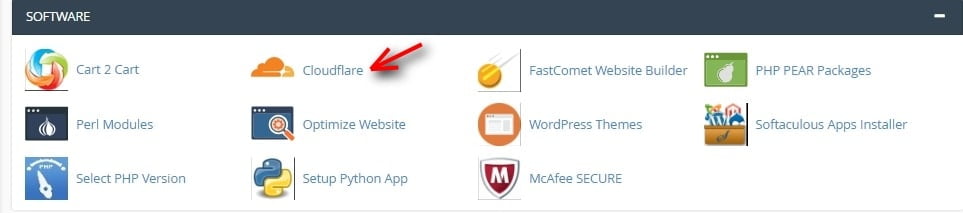
Cloudflare SetUp Through cPanel:
Installing CloudFlare is an easy process because some hosting companies have inbuilt the CloudFlare in their cPanel. Such companies may be BlueHost, SiteGround, DreamHost, and FastComet etc. You have to just log in to your cPanel and click the CloudFlare icon. By clicking the icon, you have to enter your email address. Then your Cloudflare account is configured. Once configured you can select the sites which you want CloudFlare to use.
If you have CloudFlare Sign In or SignUp now to add your Website on CloudFlare
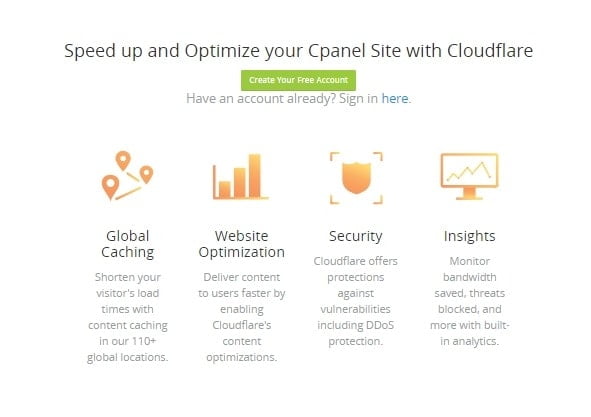
Cloudflare setup through Website:
In case if your web hosting company doesn’t provide automatically configuring through cPanel, then you can do it manually to configure it. In order to do manually follow these steps:
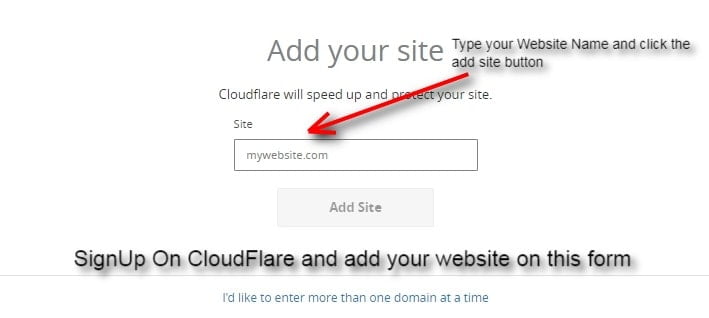
Initially, you have to log on to https://www.cloudflare.com and create a new account. There you have filled the user registration form.
Then you have click on ‘+add site’ link in the Cloudflare dashboard. And then add your website URL in the box.
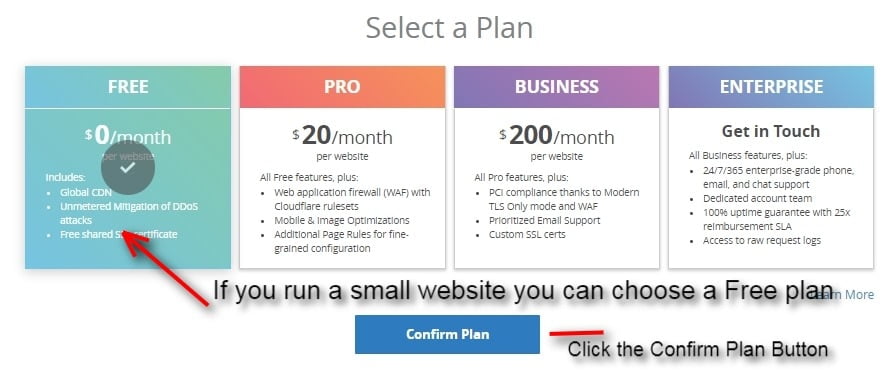
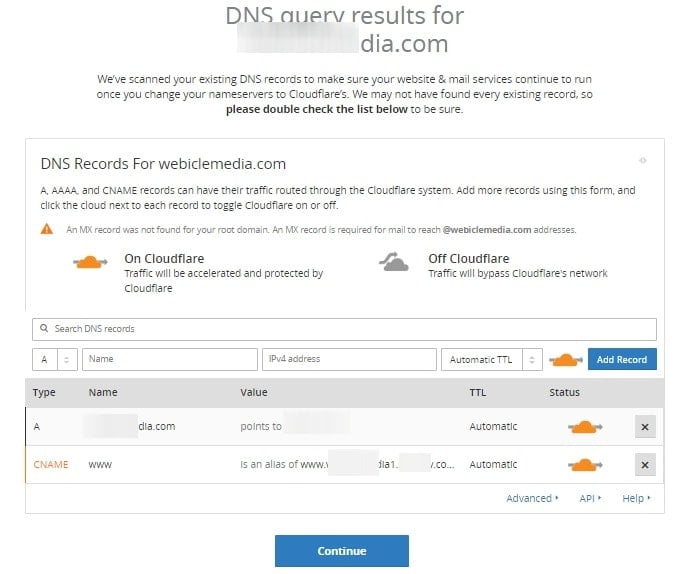
Once entering your website, the Cloudflare will start scanning the existing domain records, you have to wait until this takes few seconds. Before start scan, they will ask you to select pricing plan. If you run a small business website you can select a free plan.

Next step is to select the plan for CloudFlare account. There are free as well as premium versions. When you choose free version, you will be able to access only basic features but this works well for small websites. If you want any additional features or your website is large, then go for a premium version.
Once the scan is done, it will be redirecting you to a new page, stating that all your records have been transferred successfully. Next, it’s your choice to have certain subdomain enable or disable Cloudflare network. You will be able to find two colors, that is gray and orange. Gray color represents that you have disabled the subdomain and the request will reach directly the website. Whereas the orange color represents that you have enabled the subdomain so that all the cached will serve you through CloudFlare.
Note: If your website is not under attack then don’t choose higher performance level because it may give some issues to the genuine users of your website.
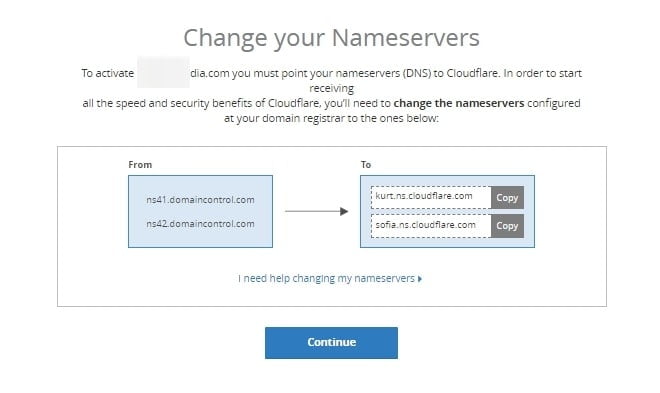
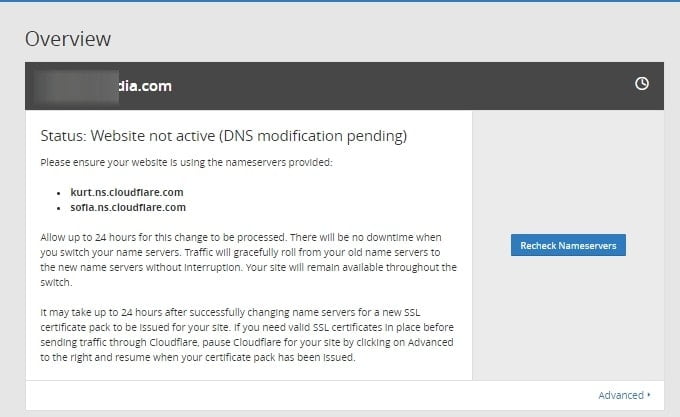
At last, you will get two DNS name servers from the CloudFlare(For eg sofia.ns.cloudflare.com). There you have to replace your domain name which is provided by the CloudFlare. Once done wait for certain time. It may even take one day to complete the process.
- Later you have the option to select the settings for security and caching performance level. There are mainly three performance levels they are basic, medium and higher. The basic performance level is a good choice for beginners. So that it won’t interact with any previous settings. Medium performance level helps you to prevent your site from spammers. The higher performance level can be used if your website is been attacked. However, it is your choice of choosing the performance level.
CloudFlare provides certain features such as App, Analytics and Threat control, Development mode, Rocket Loader. You can experience these features by clicking on to it. Hope you got an idea on how to setup CloudFlare?. There is another easy way to setup CloudFlare, that is by using CloudFlare plugin.
WordPress CloudFlare Plugin
This option is possible only if you setup Cloudflare manually. Even if you have setup Cloudflare, you can additionally install Cloudflare plugin. The main feature of this plugin is to make sure that the correct IP address displays on comments on your website. So that the spammers cannot give comments. It helps to improve the security of your website.
You can install this plugin directly from the WordPress dashboard. Once installed it takes few seconds to configure. In the Cloudflare plugin settings, you have to enter your domain, your CloudFlare API key, and your CloudFlare API email. There will a ‘Get this’ button, by clicking on that you can view your API key.
Once all the data is filled you can click the ‘Update option’ and save it. Now the CloudFlare plugin is configured. Your website now works extremely fast and it is highly secured.
Final Thoughts:
CloudFlare service is very important for any WordPress website, in order to protect your website and increase the performance. Setting process is not difficult, it is very easy to understand even for the beginners. Try to make sure your setting is correct and works effectively. Hope you liked this article on how to setup CloudFlare?. If you have any queries please feel free to comment us. You can subscribe us on Facebook and Twitter.