Are you looking to undo your changes in WordPress where unknowing you edited the content, and you have retained it again? You can easily undo your changes with post revisions. In this post, we will show you how to restore your changes in WordPress with post revisions. WordPress has an inbuilt autosave function for any posts you create.
Though you don’t click a save or publish button, the changes made will be autosaved. The editor will autosave the changes every minute (60 seconds). Once the changes are made and if you click the update, save, or publish button, the new version of the revised post will be stored in the database.
Every content writer makes revisions to produce a perfect content. Writers groom the content as much as they want so that the outcome of the content should be unique and perfect. But at times things may go wrong like the previous revision would be better than the correct revision. So they can get back the old revision post with post revisions.
This post revision is helpful for WordPress users and editors of posts with multiple authors. The admin or other authors can easily find the changes made by which author, when and where who have access to edit the posts. It is like showing different versions of your post, and you can switch between them to restore your changes.
You may also be striking with a query now that why can’t we click the undo option to restore the post? Undo option works only for one previous revision you made and if you close the window, then you won’t be able to undo the previous revisions. So that post revision function comes into handy. Now let’s see how to use post revision function to restore the changes.
How to restore changes in WordPress with post revisions
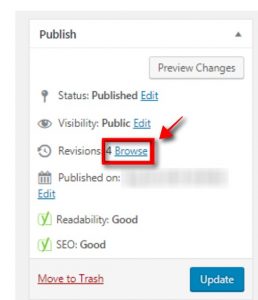
Step 1: Open the post which you have to undo the changes, at the right-hand side you will be able to see Revision settings with the “Browse” link in the post edit screen.

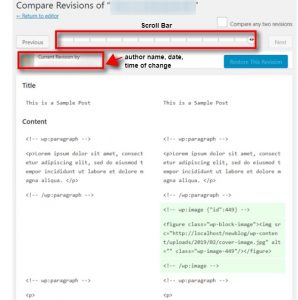
Step 2: Clicking the link will lead you to the post revision screen. Here you will be able to see all the revision of the post with a scroll bar at the top of the page. If you slide the button on the scroll bar will lead to the earlier revisions. You will also see the date and time of change, which the author has made what changes to post and so on.

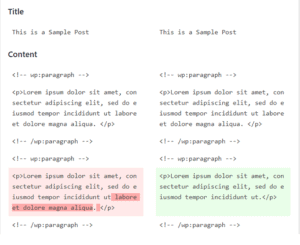
Step 3: The changes made in each revision will be highlighted in the pink and green colors for your clear understanding.

Step 4: If need you can even click the “Previous” or “Next” button to move front and back revisions.

Step 5: In case if you want to compare any revisions to check for your clarity, you can tick the “Compare any two revisions” checkbox.

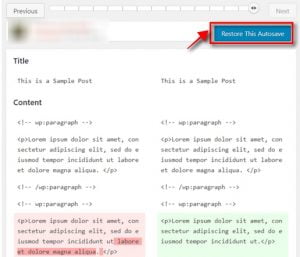
Step 6: So to restore the revisions, select the revision part by dragging the mouse and then click the “Restore this Revision” or “Restore this Autosave” button. Now the current revision will be saved.

Note: Remember that your old revision will not delete the latest revision. Instead, it will be stored as another revision.
You can even limit the post revisions to your WordPress website by adding this following code in the wp-config.php file:
define(‘WP_POST_REVISIONS’, 10);
You can replace the number 10 with any number of revisions you want.
Or, to turn off post revisions entirely you can set it to false
define(‘WP_POST_REVISIONS’, false);
But I don’t recommend disabling it completely, as they are very useful while editing posts.
Conclusion
Post revisions functionality is useful for WordPress users. Without revisions, it is not at all possible to create perfect blog content. Hope you got an idea about how to restore changes in WordPress with post revisions. If you have any queries or suggestions, please feel free to comment to us. You can subscribe to us on Facebook and Twitter.
