
In this post, we will share with you how to add Shopify to WordPress with WP Shopify plugin. Shopify is one of the best Ecommerce platforms that helps you to start, grow, and manage your business online. It lets you create and customize an online store and allows you to sell in multiple places, including web, social media, mobile, brick-and-mortar locations, online marketplaces, and pop-up shops. With this, you can even manage products, payments, shipping, and inventory.
Why use Shopify with WordPress?
WordPress is one of the best CMS and it works best as the blogging and publishing platform. However, for e-commerce, it doesn’t work out of the box. To make it work better for e-commerce you have to integrate WordPress plugins such as WooCommerce and have to configure all the aspects of payment gateways and much more.
If you compare other WordPress options with Shopify to build an e-commerce store, Shopify takes advantage with noteworthy features to build an e-commerce store. It is integrated with two security options such as SSL and PCI compliant(Level-1).
Shopify has several shopping cart options that help you to increase your conversions. It has built-in payment options, shipping rates, and automatic taxes, multiple payment gateways etc. With the WP Shopify plugin, you can include many features and does wonder to your website.
What is WP Shopify?
WP Shopify is a WordPress plugin that lets you sell Shopify products on any WordPress website. All your data is been synchronized as a custom post types giving you the accessibility of utilizing the power of native WordPress functionality.
In the front end, we create a “Shopify Buy” button to have an easy to use cart experience without using an iFrames. This plugin will not handle any payments, so once the buyer clicks the checkout button, you are automatically redirected to the Shopify checkout page to complete the entire transaction. In order to process the payments, only Shopify is used.
Notable features of WP Shopify
- It has unlimited templates that help you to build a unique online store
- You can use the Shopify SDK to host a fully featured shopping cart on your WordPress store
- It allows you to import Shopify products and collections as WordPress posts
- This plugin comes with an SEO ready design
- It has a Shopify Buy button without using any iFrames
- This plugin has 100+actions and filters that let you customize your online store however you want
- This plugin is compatible with all the WordPress plugins and themes
- It has the ability to save all the Shopify store data in custom WordPress database tables
Benefits of WP Shopify
- It has discounted shipping rates
- Very easy to install and configure
- You can have full control over the URL of your products
- This plugin gives you access to 1000+ WordPress themes and visual page builders
- You can also access 1000+WordPress plugins without any complexity
- You will have full control of the store data sync with WordPress
- This plugin has great support with extensive documentation and FAQ
- You have full advantage of Shopify’s inventory and order fulfillment features
- It comes with all the features that you need to start selling Shopify products on your WordPress website
WP Shopify comes with free as well as premium version. If you want to have additional features such as 80+templates, cross-domain tracking, dedicated support, auto and selective syncing with your Shopify store etc, then you can go for WP Shopify Pro.
How to Setup WP Shopify?
In this article, we will show you how to setup WP Shopify and integrate it with Shopify.
Step 1: You can download and install WP Shopify plugin from the official WordPress repository or directly through your WordPress Dashboard > Plugins > Add New. In the search box enter the plugin name and click “Install Now” button. Once the plugin is installed, activate the plugin.

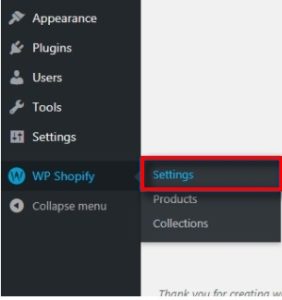
Step 2: Once the plugin is activated, it will add a WP Shopify submenu on your WordPress dashboard. Now move to WP Shopify > Settings to integrate with your Shopify store.
Note: In order to connect, you have initially, create a Shopify account and can access all the details. You have 14 days free trial account and then you can upgrade it. Add some products initially and store it.

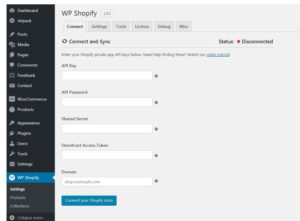
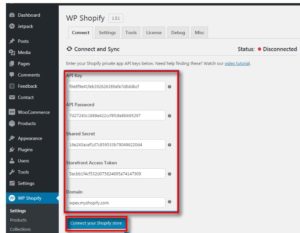
Step 3: Clicking on the “Settings” menu will lead you to a “connect” tab page. In this, you have entered the details such as API key, API password, Shared secret, Storefront access token, and domain(Shopify store domain). All these details can be accessed from the Shopify admin area.
Generating WP Shopify integration details
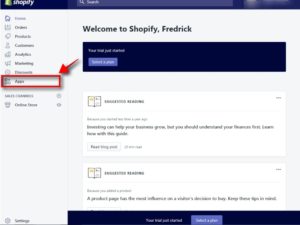
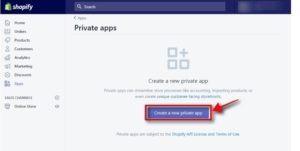
Step 4: Now you have to log in to your Shopify admin dashboard and click on the “Apps” button.
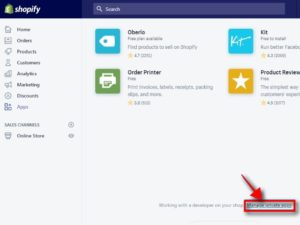
Step 5: Then it will direct you the Apps page, on that page click on “Manage private apps” link.
Step 6: And then click on the “Create a new private app” button.
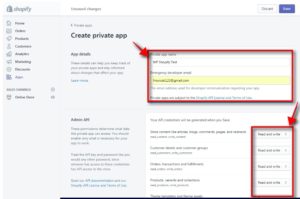
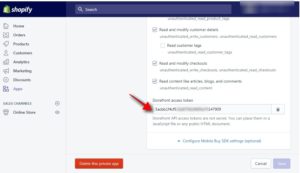
Step 7: Clicking on that button will lead you to the next screen, in that screen enter your private app name and email address. Then under the admin API section, you have to set all the options to Read and Write. Then you have to set the permissions to Read Access for fields that they don’t have an option of “Read and Write“.
Step 8: Once the permissions are set, click the checkbox option “Allow this app to access your storefront data using the storefront API”.
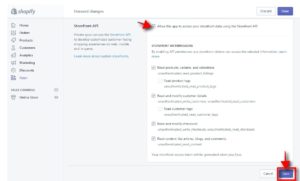
Step 9: Then click on the “Save” button to store all your settings. These settings are to create an app button. Now the Shopify will provide you the API key and all the other details that are required to integrate with WP Shopify plugin.
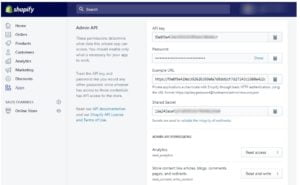
Note: You have to also find the “Storefront access token” on the same page.
Step 10: Now you have to copy all the details and paste it in the required fields on the WP Shopify connect tab. Then click the “Connect your Shopify store” button to synchronize.
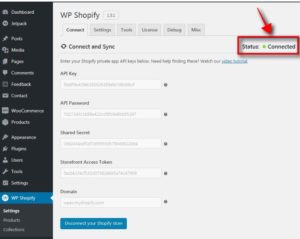
Step 11: Once the button is clicked, your Shopify shop is now integrated with your WordPress website. You will get a status as “Connected” in the WP Shopify connect tab.
Step 12: After that navigate to WordPress Dashboard > WP Shopify > Products menu, you will be able to see that the WP Shopify plugin has imported all your products from Shopify.
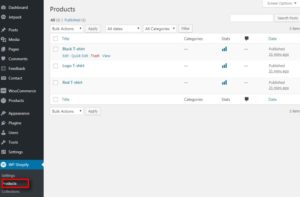
Note: You will be able to import 250 products at once from the Shopify account.
That’s it your products from Shopify is added to your WordPress website using WP Shopify plugin.

There are even additional settings that you can explore with your WP Shopify WordPress dashboard.
Settings Tab
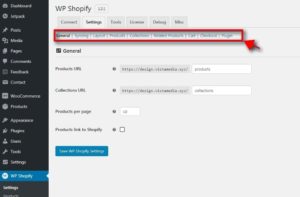
This tab provides you with plenty of options to manage your online store with any difficulty. You will be able to control the products URL, the number of products per page, syncing, breadcrumbs, pagination, product display layout including images, colors, collection display layout, related products, cart, and checkout process. Once done click on the “Save WP Shopify settings” to store your settings.
Tools Tab
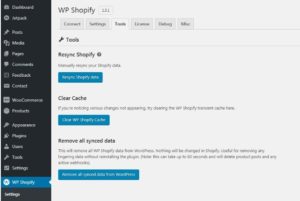
This tab is mainly used to resync your Shopify data, clear all the WP Shopify cache and remove all the synced data from WordPress.
License Tab
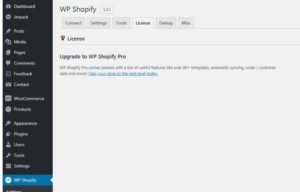
This tab is used if you want to upgrade your WP Shopify plugin to a Pro version. It comes in handy an easy way to switch to WP Shopify Pro.
Debug Tab
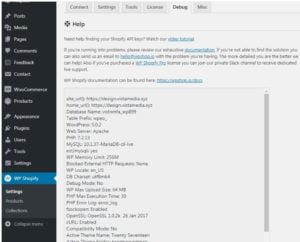
Debug tab helps you spot the errors and get support.
Misc Tab
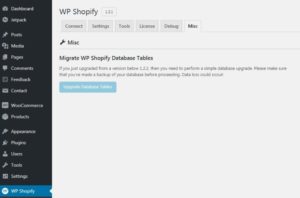
This tab allows you to upgrade database tables if you have upgraded the version below 1.2.2. Make sure you have a backup before upgrading the database tables.
Conclusion
Implementing Shopify with WordPress works out of the world to build an e-commerce store. With WordPress, you will be still powered with the best blogging and publishing platform and with Shopify to don’t have to rely on many plugins to build an e-commerce store.
Both of them integrate well without any issue and gives you a wonderful outcome. You don’t have to know any technical knowledge working with. Hope you understood how to add Shopify to WordPress using WP Shopify plugin.
If you have any queries or comments please feel free to comment to us. You can subscribe to us at Facebook and Twitter.