
The loading speed of a website is very important. In case if your website takes much longer time to load a page, then users will face a bad experience and they might not enter into your website again. So this might reduce the user’s visit and due to its poor performance, the SEO ranking will also move down. When you take a website, its loading speed and performance is a must. In order to avoid those situation caching plays a very important role. The concept of caching is that it will store the dynamically generated data in a static format. So whenever you want to same content, the content will be retrieved very fastly with no further delay. In WordPress, there are numerous caching plugins available. Among those ones of the best cache plugin is WP Super Cache. WP super cache settings are also quite easy to understand.
WP Super Cache is one of the excellent plugins for any WordPress website. It does wonders once installing this plugin. WP Super Cache is available in both free and premium version. Knowing about its importance, this plugin is used by many users for their professional websites. When you take any website, its loading speed and its performance are considered more important. When the loading time is drastically more, then it obviously kills the users time and its SEO ranking will be totally down. But with the help of this plugin, the loading speed is effectively reduced and it has a drastic improvement in performance. This plugin creates a static cache page and loads them rather than loading the PHP file every time. By doing so, the speed is drastically fast and serves the page without any delay. So if your website needs more eye cache and a good SEO ranking, it’s the best choice to use WP super cache for your website.
As for the beginners, it will be quite difficult to understand how to install and configure WP Super Cache. In this post, we will let you know the steps to install and configure WP Super cache plugin.
Installing WP Super Cache plugin
The following steps will show you how to install WP Super Cache on your WordPress website:
- Enter into your WordPress site dashboard
- In the left side navigation, you will see plugins and click on to it
- Then there is an option Add New just click on to it and search for “WP Super cache” in the search box
- Once the plugin is found, click on install now button and activate the plugin
Now WP Super cache is activated on your blog. But one thing to be noted is, before installing WP Super cache make sure that all other cache plugins are uninstalled. Once you install this plugin, you have to configure it to enable its features to work on your website.
Configuring WP Super cache plugin
Initially for the beginners, configuring WP Super cache will be quite tricky to understand. So here we will explain you to configure WP Super cache settings.
In order to configure, WP Super cache goes to the Settings option and click WP Super Cache.
You will find a few tabs for the configuration and you have to enable certain options to make your page load faster and effective.
Easy Tab Configuration
This easy tab is the first option in WP Super cache setup. Once you click this easy tab, you will find two options as caching on and caching off. With these two options, you have to turn on caching on an option which is a recommended one. Once you turn on, press the ‘Update status’ button.
In case if you need a new version of cache, then click on the ‘Delete cache’ button which is under the ‘Update status’ button. Then you will find certain links and plugins below, which you may want to install. Once you have done with easy tab configuration, now click on the advanced tab.

Advanced Tab Configuration
Advanced tab configuration makes your website work effectively. In the advanced tab, there are few options, you have to check on those options. The first option under Advanced tab is caching option, there you have to click on ‘enable caching’. As given, it is recommended to check on. In WP Super cache settings, the advanced tab is quite difficult for the beginners to understand.
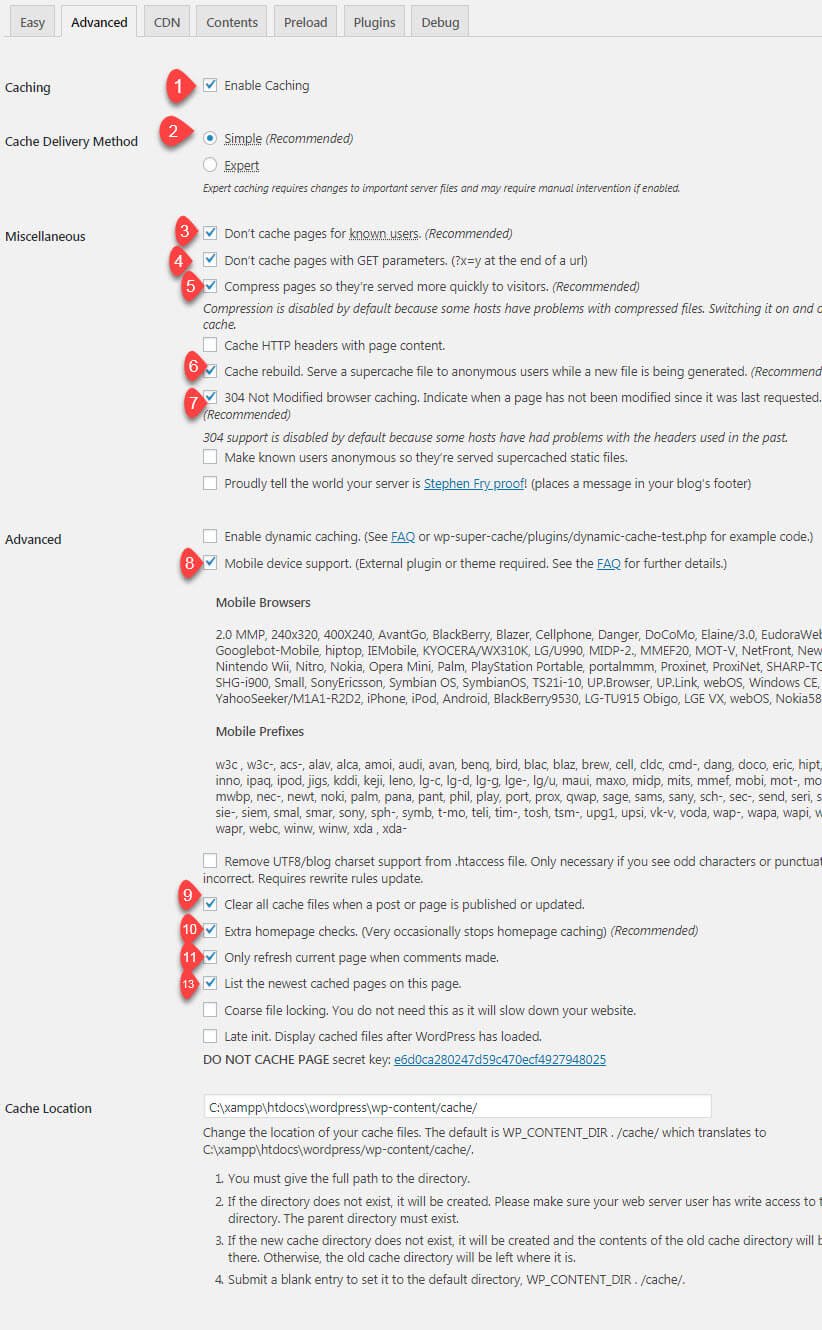
In the Cache delivery method, there will be two options Simple and Expert. By enabling simple option is recommended. By if you require expert option, you can enable it. But by enabling an Expert option, you have to update mod_rewrite rules.
Then the option is Don’t cache pages for known users→ This option is recommended. You have to enable this option. This option states that the logged in users, don’t have to get the cached files, instead, they will view all the dynamically generated, latest updated versions of your pages.
The next option to check on is Compress pages so they’re served more quickly to the visitors→ Compress page is used to reduce the size of your file. It will reduce the size of HTML, CSS and JavaScript files. So by enabling this compress, the cached files are given my faster to the users.
Next option to check on is Cache rebuild→ The cache rebuild option is used to serve you the cache files even when there is an update in the cache or the cache period is expired. The good thing about this option is that the users are served at a right time so that they don’t have to wait for it.
Then the next option is 304 Not modified browser caching→ This is HTTP response status code. This status code saves your resources and time. By enabling this method, it states that the cache page remains the same since last transmission and there is no need to cache again and send it to the users. With this, the browser effectively communicates and comes to know what to be downloaded and what can be delivered from a cache.
The next option to enable is Mobile device support→ This option is exactly for the portable device users like mobile. Enabling this option gives the cached files for the mobile users.
Once you check on the above options, click on ‘update status’ button and save all the settings. Then if you find any error like a difference in mod_rewrite or .htaccess rule, don’t get confused, just click on the Update mod_rewrite rules under the advanced tab settings.
Now if the settings turn green, then everything is set fine. In case if you want to test this plugin, go to the easy tab and click the ‘Test cache’ button. Here it will start fetching your homepage twice, and everything goes fine it displays a message as ‘The time stamp on both the pages match’. This is the basic steps for the beginners.
Then to get deep into it go to the advanced tab and there is an option Expiry time and garbage collection→ This option is used to specify, how long a file to be cached, before its latest update and the time specifies how long the existing files should exist before cleaning them up. Here you can click on the cache timeout and scheduler option. Give the settings as 1800 seconds which is good for a busy traffic.
CDN Tab Configuration
CDN stands for Content Delivery Network. CDN is generally a group of servers located all over the world.With the help of CDN, the page can be loaded fast. When a browser starts loading a static page, then the request is given to the server. But with CDN the request is given to the server which is geographically close to the server. So what happens is, the page is loaded fastly and gives you the requested page in much lesser time.
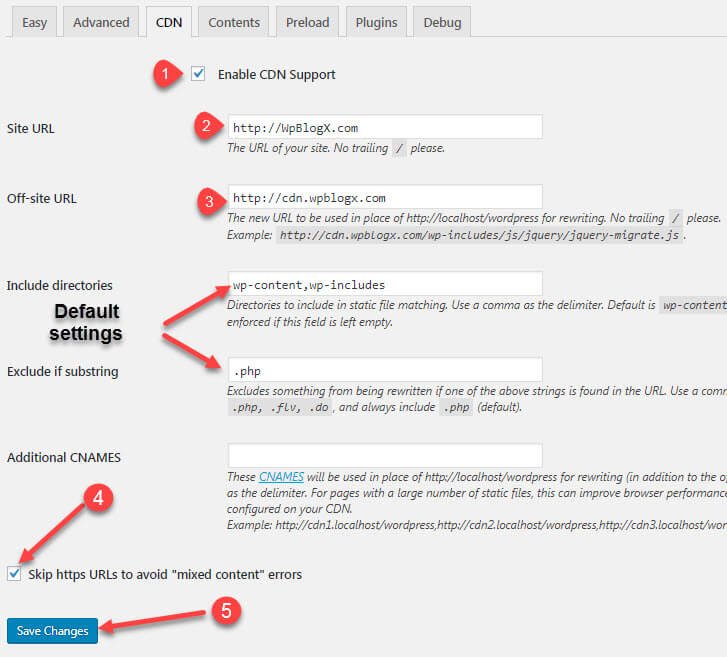
You have to click the option ‘enable CDN support’ under the CDN option. There you have to enter your off-site URL (for eg https://WpBlogX.com), here you have to replace the new URL as https://cdn.wpblogx.com. Include directories and exclude if substring options are the default. You don’t have to make any changes. Then in the CNames options requires if you want to serve files from different CDN URLs.
The advantage of this option is the browser can open several connections at the same time and down the files parallelly. CNames can improve your website performance if you want different web browsers. This is optional. Once done, you have to check the ‘Skip https URLs to avoid mixed content errors’. Now click on save settings option. There are mainly two services for CDN, they are MaxCDN and CloudFlare.
MaxCDN
MaXCDN is usually a Content Delivery Network.This is a service used to deliver the static content of the website to the visitors who have to request it in the fastest way. The content of your website will be more protective. Its main intention to speed up the website and reduces the server load. The user’s experience will also be great. MaxCDN WP Super cache is available only in premium.
CloudFlare
CloudFlare is also a Content Delivery Network. It is mainly used to increase the network performance and security of your website. It caches the static content of your website and delivers the result in a much faster way. WP Super cache with CloudFlare is available in premium as well as free version.
Content Tab Configuration
This tab just lets you know the status of your cached files. When you click on the regenerate cache stats, it gives the status of how many pages are being cached so far. With the help of this, if you feel you have too many cached files, you can decrease the expiry time.
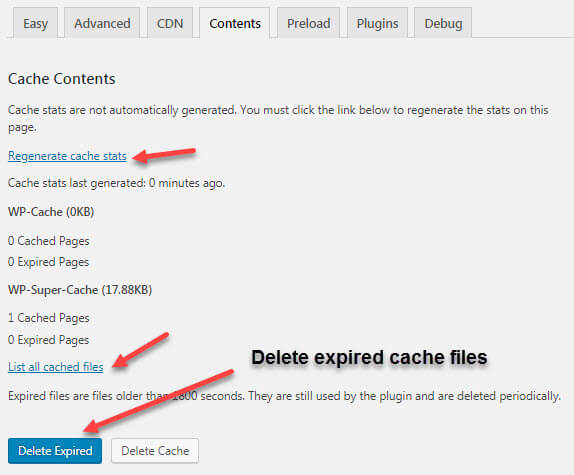
There is an option delete expired which invokes the garbage collection and to come out of the expired files. Basically, delete cache option is used to delete all the cached files.
By clicking the list all cached files option, it will display the current cached files. But if you have a large website, this will take a long time to process. In WP Super cache settings, the content tab is just viewing the details of your cached files.
Preload Tab Configuration
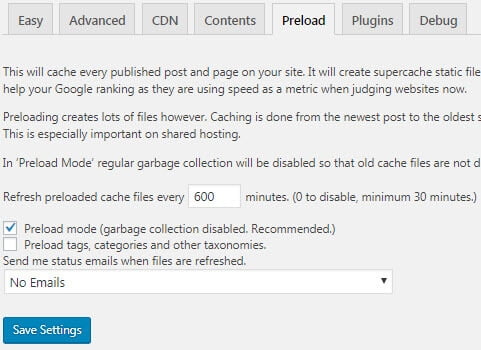
This tab creates a static super cache web page for your WordPress website. The preload tab caches all the posts and pages which are published already and those files never get deleted. This option turns off the garbage collection. But in case if you have a huge website, then the process takes very large time.
Plugin Tab Configuration
Basically, WP Super cache itself has some inbuilt plugins. These plugins will be located in \wp-content\plugins\wp-super-cache\plugins. In this option, you just have to enable or disable the plugin which you require. It’s your own choice to choose which plugin will merge well and gives a pretty good functionality combing with WP Super Cache.
Debug Tab Configuration
This tab is mainly used to troubleshoot the problem which is caused by the plugin. Only by logging in you will be able to keep track of bugs. You also have an option of enabling the cache status message, but doing so you don’t have to log in. There is a page generation time, just by viewing it you can easily find where the database or your server is slow. You need to know that the page generation time is not the speed of your page loading, it is the time taken by the WordPress to load the HTML files before the files are saved to cache.
These are the options to consider while configuring WP Super cache plugin.
Final Thoughts
We hope this article would have greatly helped you to know about installing and configuring WP Super cache settings. We would highly recommend you to use caching for any of your WordPress websites, in order to increase your site’s performance and speed. When comes for caching WP Super cache plugins takes a very important place. If you have any queries please feel free to comment us. You can subscribe us on Facebook and Twitter.