Most website developers would have an opportunity in developing the websites more than one. Some of them would say that WordPress doesn’t have the capability of creating multiple websites, but it’s wrong. It has the capability of creating multiple websites using the same WordPress installation. This multisite network feature looks good for many developers, schools, businesses, etc. who need to run multiple websites under a dashboard.
This article will give you a detailed view of how to install and setting up a WordPress multisite network in your WordPress site.
What is WordPress Multisite Network?
WordPress multisite means that adding multiple sites to your WordPress installation. It is an additional feature in WordPress where you can add to either your newly created WordPress site or to an existing one. In order to activate, you should add some codes to a couple of files (I’ll show you shortly). WordPress Multisite is simple, just enabling the WordPress settings to run and manage multiple websites under a single WordPress installation and dashboard.
The WordPress website comes up with advanced features where you can easily manage and customize each website or blog on your network. All the new sites can easily manage under a single username and password.
The WordPress website comes up with advanced features where you can easily manage and customize each website or blog on your multisite network. All the new sites can easily manage under a single username and password.
Advantage
WordPress multisite network looks more useful in managing than multiple standalone WordPress sites. The following are the advantages of using WordPress multisite network:
- Using a single dashboard, you can easily manage multiple sites as a network administrator.
- Each and every site will have individual admin and they have the capability in managing their websites.
- A single download of plugins and themes, it can be used for multiple sites.
- It is very easy to manage the updates because all the updates could be manageable by using one master install.
Disadvantage
There is a need to say about the disadvantage of using the WordPress Multisite Network. Sometimes, creating a WordPress Multisite network will not be more helpful in managing multiple sites.
- In some situations, the network may get down, which means the sites linked to the network also get down.
- As a beginner, it will be more difficult in managing network traffic and server resources. There may be unexpected traffic for a site and that may affect other sites.
- If a website got hacked that means all other websites will be under hackers, unfortunately.
- You may experience problems in using the WordPress plugin which may not work properly on a multisite network.
- Some web hosting providers won’t support the multisite network in WordPress and this limits your option in using the multisite option in WordPress.
So, overall using WordPress multisite network looks more comfortable and efficient to manage the multisite under a single dashboard. There are many third-party plugins like InfiniteWP and iThemes Sync to manage multiple WordPress sites. Some of the scenarios like magazine websites, business websites, government websites, etc. can be maintained using the WordPress multisite network.
Requirements
The requirement satisfaction is very important in all the projects, also in implementing the WordPress multisite network. So, the following are the requirements in implementing the WordPress multisite network.
The first requirement you should consider is WordPress hosting. If you are moving to the multisite network then you need to fix on using the shared hosting. I recommend you to use ‘Bluehost’ because they provide dedicated servers and also shared hosting.
We also recommend alternate web hosting providers WPEngine, Hostinger and FastComet.
Apart from the hosting, you should need knowledge on installing WordPress and editing files using FTP.
How to create a WordPress Multisite Network?
Choosing a domain structure
You can add a new site on subdomains or sub-directories, on your WordPress multisite network.
Example:
http://site1.example.com – For Subdomain
http://example.com/site1/ – For Sub-directory
Look, if you need a subdomain then you need to set up wildcard subdomains (Explained in next step – setting up wildcard subdomain). If you go with a sub-directory then you can skip the next step – Configuring Network Settings.
Setting up Demo Subdomain Name
If you need to go with subdomains then you need to configure wildcard subdomain for your multisite network. To do that you need to login into your cPanel dashboard. Then go to the option ‘Domains -> Subdomains’.
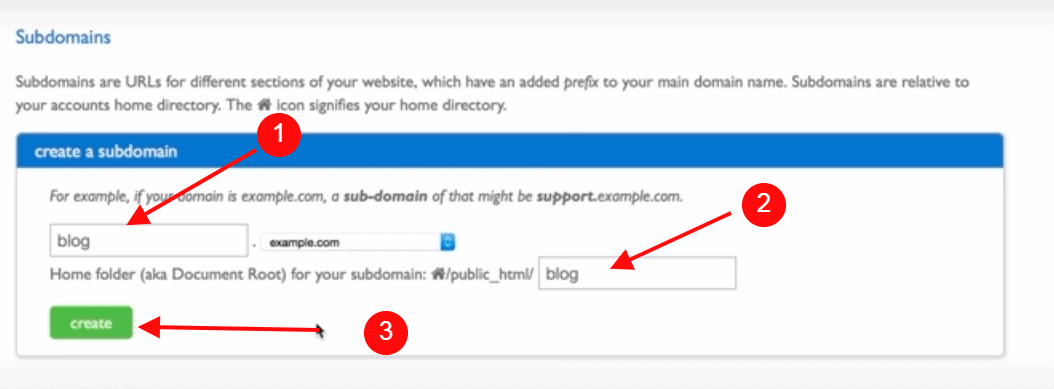
Then just enter ‘blog’ in the subdomain field and click on the ‘create’ button to add your submission. You can enter any name you want in this field. In this post, in the below screenshots I used WPBlogX as a subdomain name.
Enabling Multisite Network Feature in WordPress
Actually, the multisite feature is built-in in WordPress. Only you need to install the WordPress and enable the multisite feature after the installation. The multisite feature can be used on any of your WordPress versions, before doing that just backup your WordPress site.
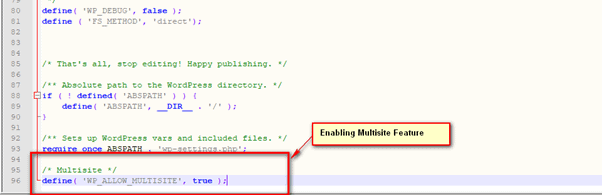
In order to enable the Multisite feature, connect your site with cPanel manager and just open the file ‘wp-config.php’.
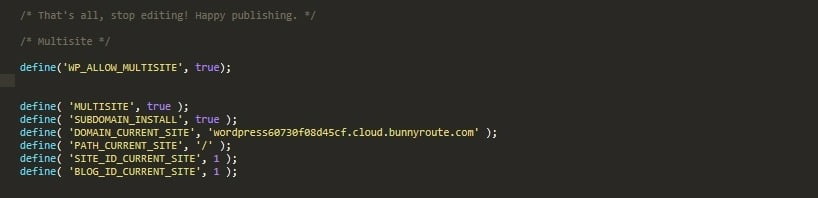
Then you need to add the following code inside the file ‘wp-config.php’.
/* Multisite */
define( ‘WP_ALLOW_MULTISITE’, true);
Check the below screenshot. Check the Below screenshot, the code is edited by using NotePad++.
After adding the code above, save the file and upload the file to the server. This code will enable the multisite feature in WordPress but still, you need to set up the multisite feature.
Setting up a Multisite Network for your WordPress
Up to now, you have enabled multisite features but you need to set up the multisite feature to enjoy. The below section will give you the details to set up the feature.
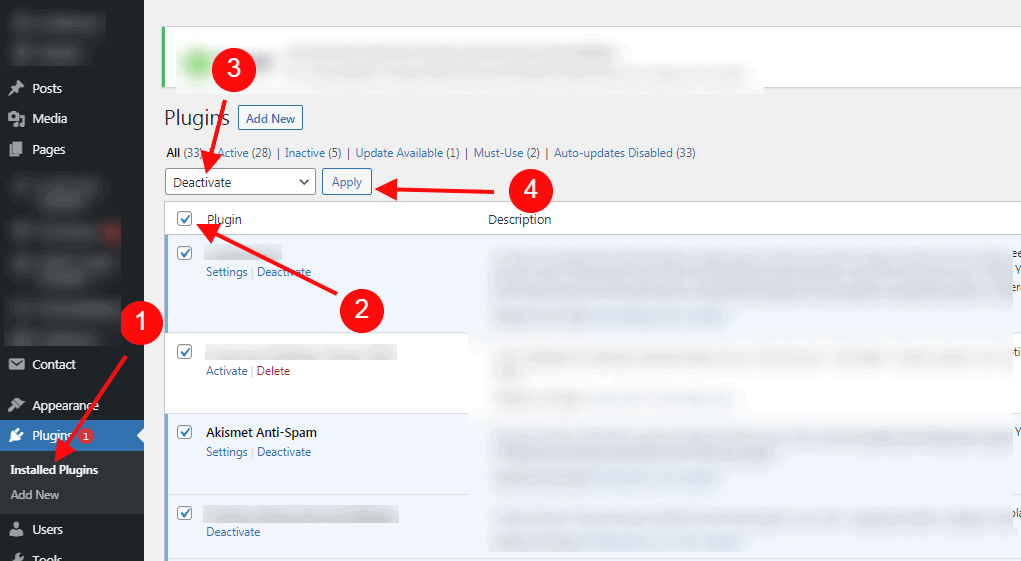
First, you should deactivate all your plugins that are activated in your WordPress. To do that, go to ‘Plugins -> Installed Plugins’ and now select all plugins. Select the ‘Deactivate’ option from the ‘Bulk Actions’ dropdown menu and click ‘Apply’.
To configure the multisite website, go to ‘Tools -> Network settings’.
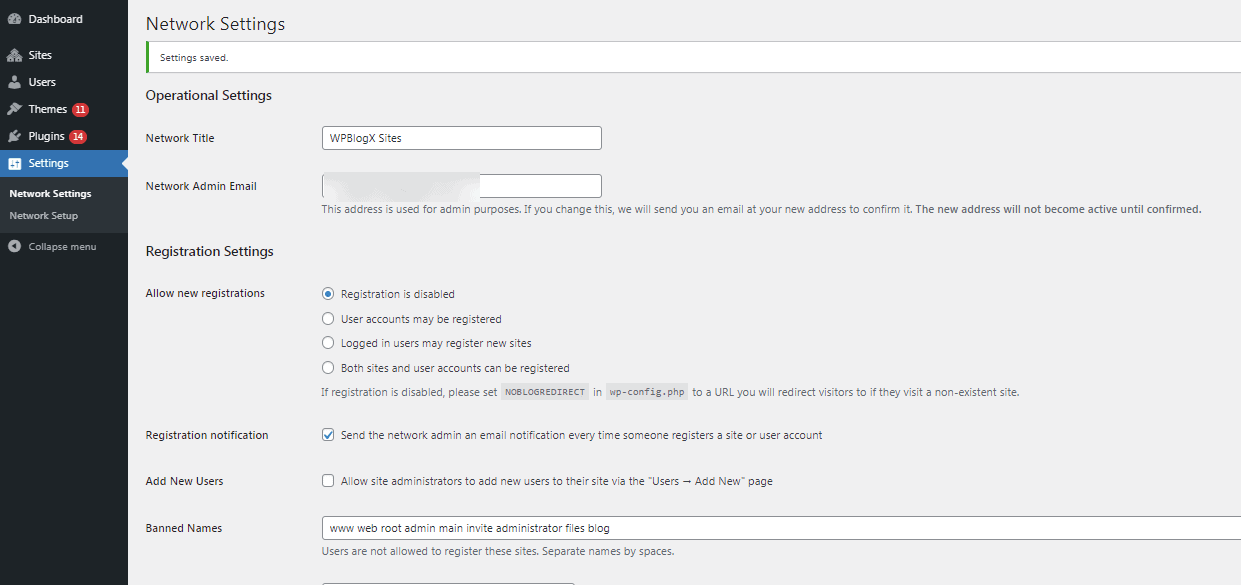
Then give the title and give the network admin email. Finally, click on the install button.
Once the installation is done, WordPress will show you some code and this code should be added in your file ‘wp-config.php’.
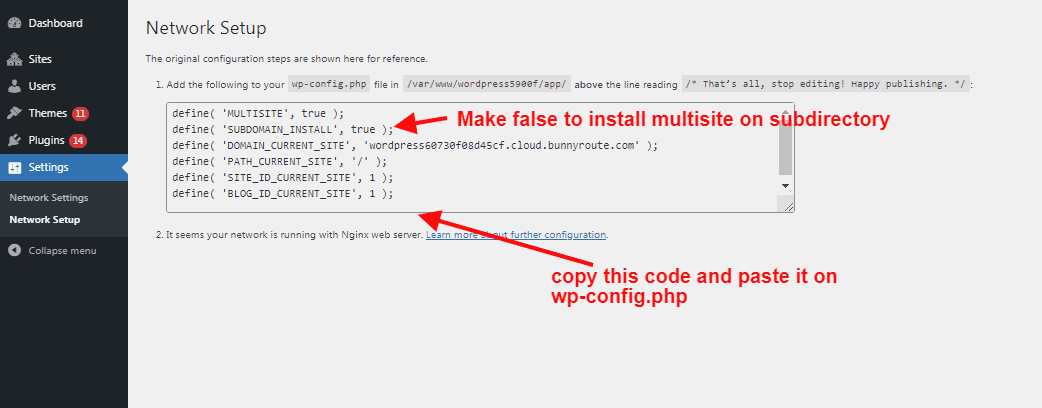
You need to copy and paste the above code on wp-config.php. On the second line make ‘false’ to install multisite on the subdirectory.
Use the file manager to add the code into your WordPress. After that, you need to re-login into WordPress to access the multisite network. The below code is edited by using a sublime text code editor.
Configuring Network Settings
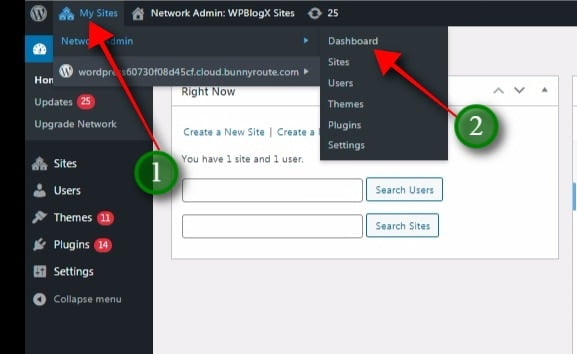
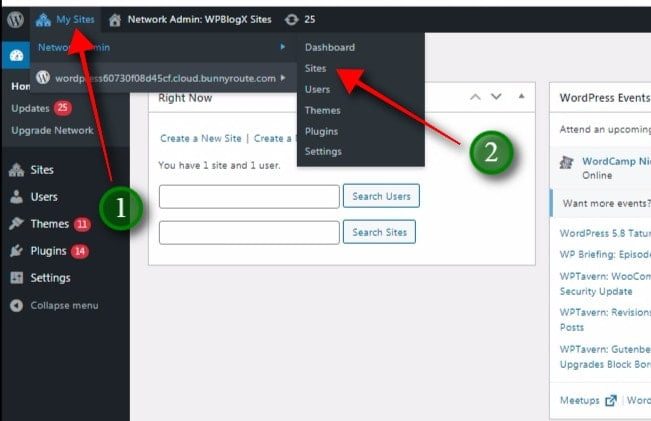
Now it’s time to configure network settings because still now you have set up the multisite network. Now you need to switch to ‘Network Dashboard’ and add a new site, configure other settings. Choose ‘My sites’ -> Network Admin -> Dashboard.
You will now get a new dashboard which gives you an option to create a new site and new user. This is called the ‘Right Now’ Dashboard.
Click the ‘Settings’ link in the dashboard which is to configure the network settings. It shows the network settings option, where you can set your site title and admin email address. These fields will be filled automatically with the network title and admin email you entered during setup.
On the network settings page, you can configure important settings based on your requirements.
Adding New sites
To add a new site to your WordPress multisite network, click the ‘sites’ option from the Network admin option.
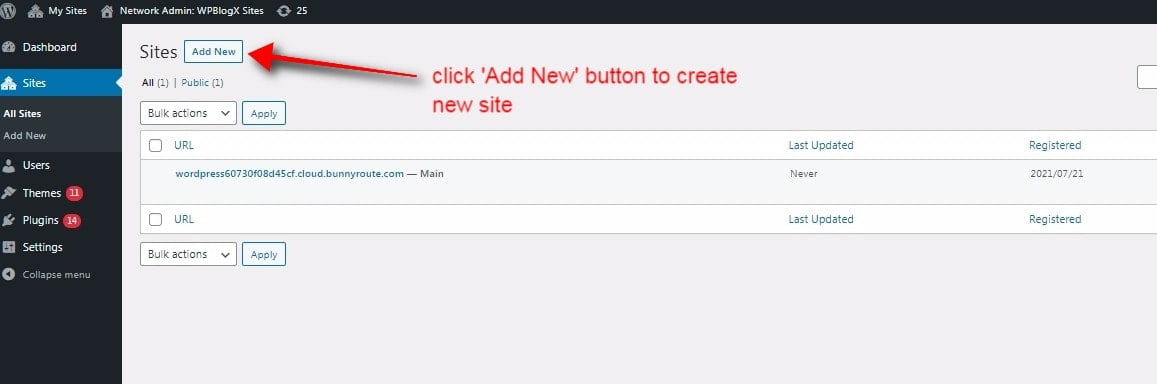
This shows the list of sites on your current multisite installation. If you need to add a new site, then click the ‘Add New’ button.
Check the below screenshot to understand how to create multisite on the subdomain. And the new site is created on the subdomain.
Create a new site on the subdirectory.

Successfully created a new site on the subdirectory.
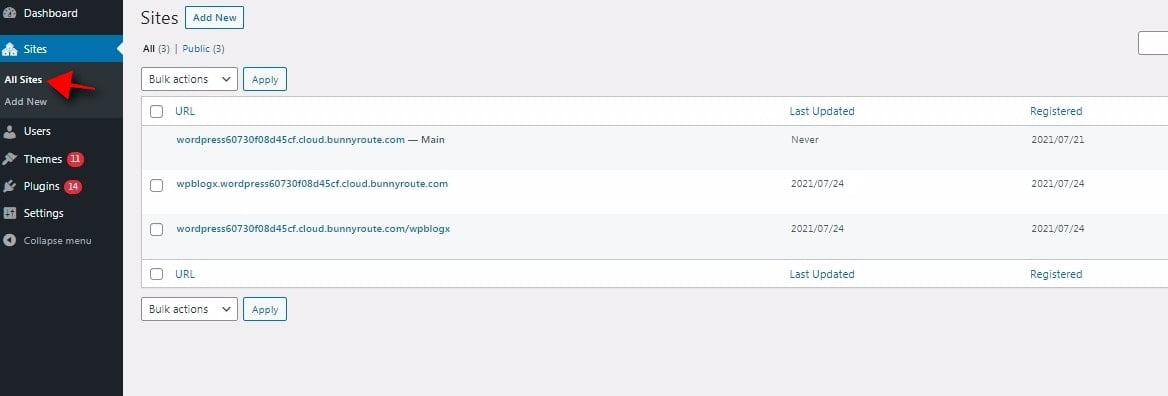
And here is the screenshot of sample sites created on the WordPress multisite network.
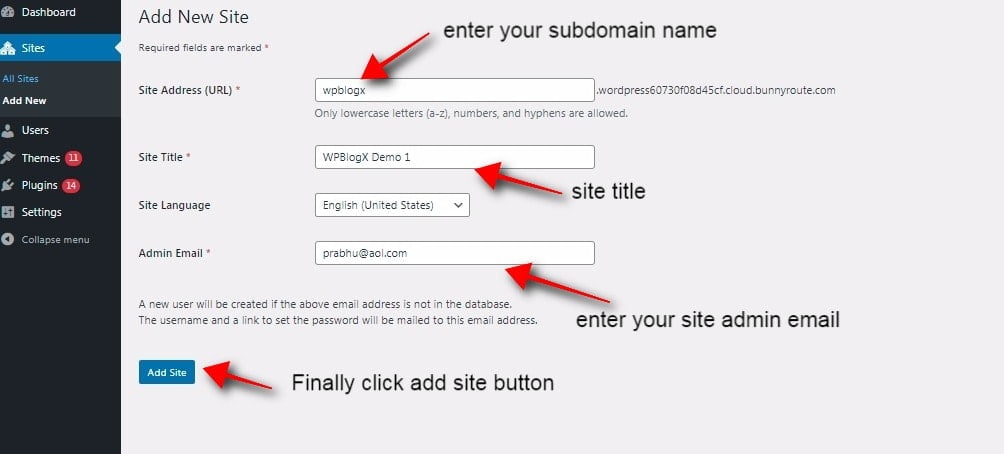
The ‘Add New Site’ page, allows you to provide your site address. You don’t need to give your full address. Other than that, you can add a site title, language and admin email. The username and password will be sent to your email id. Finally, click on the ‘Add site’ button.
Now you will get the email regarding the new site registration email followed by the instruction to reset the new password and log in.
Adding Themes and plugins to your Multisite Network
The themes and plugins can be installed only by the network administrator and the individual network site administrator will not have the right to install those.
To install themes, just go to the ‘My sites -> Network Admin -> Themes’ page.
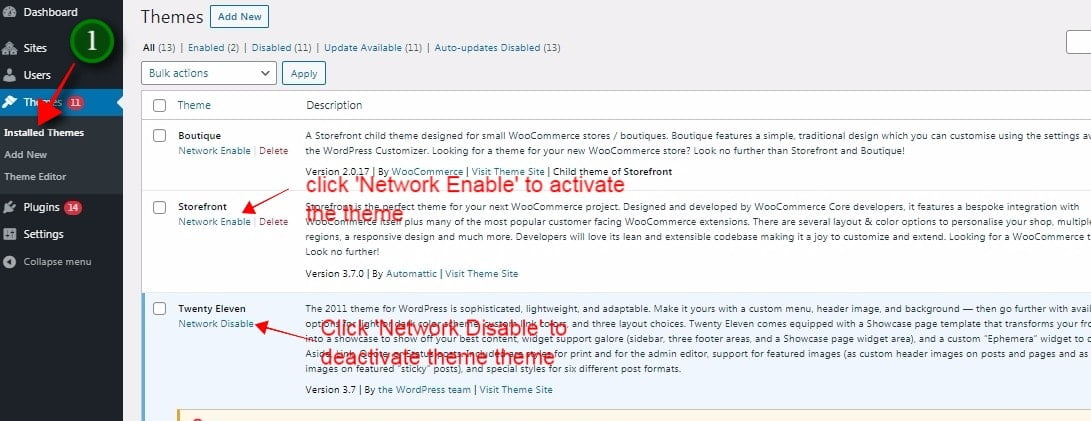
The themes page shows the list of themes available, if you need to enable it for the network then click the ‘Network Enable’ option. Also, you can disable the themes for the network by clicking on ‘Network Disable’.
In case you need a new theme, then click on the ‘Add new’ button on the themes screen. Once the theme gets installed then click the ‘Network Enable’ option to activate.
Install plugins for your multisite network
New plugins can be installed by moving to the plugin screen. Go to ‘My sites -> Network Admin -> Plugins’ and click on the ‘Network Activate’.
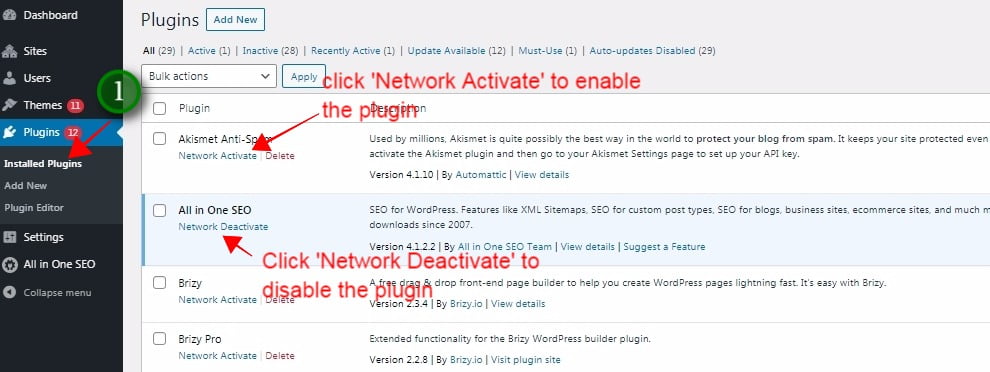
If you need a new plugin then click on the button ‘Plugins’.
Summary
I hope the article helps you in creating a multisite network using WordPress. Now you can easily add new sites, themes and plugins and configure network settings. It looks like a regular standalone version of WordPress, but you can do more than you need. While considering the multisite option, it allows you to manage multiple sites at a time.
Hope you like our WordPress tutorial about how to install and set up WordPress Multisite Network. You can follow us on Facebook and Twitter to get the latest updates about WordPress themes, plugins, tutorials and news.