Many of us use WordPress for our websites and blogs. The platform has many features that make it a very useful website tool. However, one thing that we all know and hate is slow page load speeds. If your website loads slowly, visitors might leave your site before they are even done reading the page. This can lead to lost sales or leads. And if your website is just not performing, it could cause you to lose customers, too.
One of the most common mistakes that webmasters make when creating a WordPress website is using images without preloading. While this may seem like a minor detail, the impact it has on loading speeds can be dramatic.
As we have learned, preloading images is one of the easiest ways to speed up your website, and there are a number of plugins out there that allow you to do just that. In this course, you will learn how to preload links in WordPress for faster loading speeds.
Why Preload links?
Preloading links is a technique that we can use in order to make our websites load faster. This technique helps us to speed up the loading of a website by preloading the links that are important to the user.
Preloading the links on the WordPress pages is very important for the SEO (Search Engine Optimization) of your website. The reason why is that it makes your website’s loading time faster and more user-friendly.
Preloading the links can also increase your website’s Page Speed score. It’s really an important thing to check if your website has any problems with loading speed.
When it comes to SEO and page load speeds, there is a lot of information on the web. One of the first things to look into when optimizing for SEO is preloading your images and CSS files.
There are two main benefits to preloading these files:
– Increases the overall performance of your site.
– Improves the load time of your pages.
Add Preloaded Links Manually
When you are editing your posts or pages, there are two ways to add a preloaded link:
a) Using the Visual Editor:
- To add a preloaded link to a post or page, go to “the visual editor” and click on the “Linked Content” tab.
- Then click on the “Add Link” icon to add a preloaded link.
b) Using the HTML Editor:
- To add a preloaded link to a post or page, go to “HTML editor” and paste the code for the link you want.
Add Preload Links Using Plugin
There are many plugins available to help you pre-load links when someone opens a page. For example, you can have a plugin that adds a link at the top of every page to another page that has more information. One of the best preload link plugins is Flying pages.
Flying Pages Plugin
The flying page plugin is a javascript library that makes it easy to add an extra “page” on your site. You can use it like any other page and you don’t need to do anything special to your HTML. You can create a link to a page on another site by using the http://protocol (http://, https://) and domain (www.) syntax. Just place a link to the page where the plugin will insert itself.
The flying page plugin adds the ability to link any page to any other page on the website. For example, suppose you have a page that shows a photo of a house. You could use the plugin to make it easy for visitors to go to another page that shows information about that house.
How to configure Flying Pages Plugin
Step1
Initially install and activate the flying pages plugin. It is a free plugin that you can directly download from the WordPress repository.
Step2
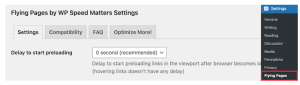
Once activated, move to Settings>>Flying pages in your admin panel in order to configure the plugin.
Step3
A drop-down menu will appear, in that set the “Delay to start preloading” option. This option is actually set to delay the preloading if the user’s mouse is idle in the browser window.
Note: You can set time as you wish, but the default setting is 0 seconds.
Step4
Then the next option is “Max requests per second”. The default setting is 3 requests which will work for all the hosting environments. The lower the set request, the less impact on the server.

Step5
Then just click on the check box “Preload only on mouse hover”. The option works only if the user hovers the mouse over it and will start preloading the page if they click it.
Step6
Then the next option is to set “Mouse hover delay”. This time will pass only after the user hovers the mouse on the link before preloading starts.

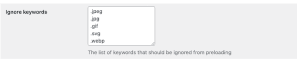
Step7
A list of keywords will be displayed that have been ignored by the plugin for preloading. All the listed keywords are standard page files and image formats. It’s your wish to leave the list as it is or you can add a few keywords to it.
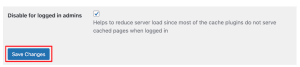
Step8
The last step is “Diable for logged-in admins”. You have to click on this check box in order to reduce the server load since most of the cache plugins do not serve cached pages when logged in.
Step9
Finally, click on the “Save Changes” button to save all the changes done.
This plugin is one of the finest, simplest and easy ways to preload links in WordPress for faster loading speed.
Conclusion
One of the biggest reasons why your website will load slowly is due to having too many images on your page. When you preload links in WordPress, the browser knows how big those links are so it doesn’t have to wait for them to download. This can save you between 50%-70% of your page’s loading time.
It also gives you more time to focus on the content on your site. Hope you got an idea about how to preload links in WordPress. If you have any queries or suggestions please feel free to comment. Your comments are most welcome.